Red Hat’s Migration Toolkit for Applications (MTA) provides a migration solution for applications in the hybrid cloud environments on Red Hat OpenShift. This is provided via the MTA Operator, currently at the seventh version, and other means such as the MTA Command-line Interface (CLI) executed via podman/docker, Visual Studio Code extension guide, and IntelliJ IDEA plug-in guide. For questions regarding the MTA Lifecycle, see this link.
MTA provides target migrations for Red Hat JBoss Enterprise Application Platform (JBoss EAP) 8, containerization, SpringBoot to Quarkus, OpenJDK version migration, Oracle to OpenJDK, Windows to Linux, Jakarta EE 9, JWS 5 to 6, and several more paths. Here is a list of migration paths and use cases.
It is very useful and convenient given that many rules were written for the migrations above, and each migration path will provide a series of migration rules that are compared with the binary or the source code. MTA also allows the addition of new rules during the analysis part, which can be included directly on the console.
In the matter of migration and its efforts, migrating applications to the cloud or JBoss EAP 8 server (and JBoss EAP 7) deployment can be a huge task—even small applications can be challenging. Red Hat MTA 7 provides features for cloud-ready and application migration such as OpenJDK, therefore contributing to less manual work.
This article will demonstrate how to install the MTA Operator 7, provide an example analysis, show the JBoss EAP 8 migration path, show customizations that can be done, and then finish with some troubleshooting hints. Note we always recommend using the latest MTA available.
MTA 7 Operator demonstration
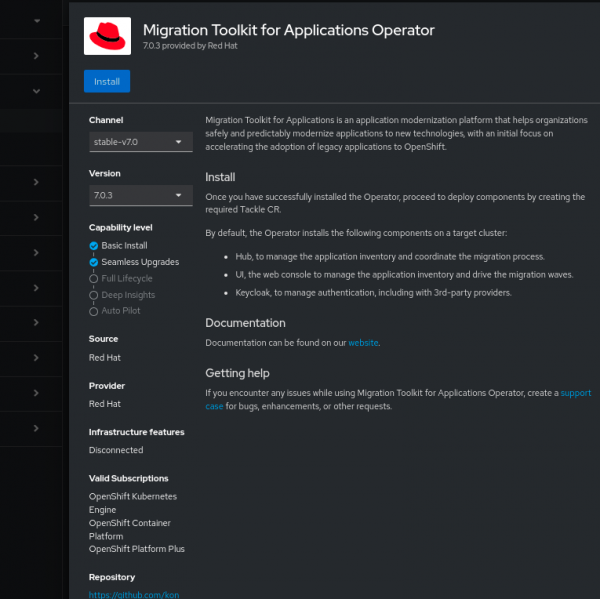
The installation of the MTA Operator is done using OpenShift 4 Operator Lifecycle Manager (OLM)’s Subscription YAML creation, either by manually creating the YAML or via the user interface. Below is an example installation from the OperatorHub. First, select Migration Toolkit for Applications Operator. See Figure 1.
After confirming the subscription installation, the MTA Operator will be installed on the openshift-mta namespace, a new namespace created during the installation. Together with the MTA Operator, the Red Hat Single Sign-On Operator will be installed also in the openshift-mta namespace, the result of which is shown in Figure 2.
After that, the next phase is to create the Tackle CR, which is required for the analysis. A trivial Tackle CR will be as below:
apiVersion: tackle.konveyor.io/v1alpha1
kind: Tackle
metadata:
  name: tackle
  namespace: openshift-mta
spec:
  feature_auth_required: 'true'
...
$ oc get tackle
NAME     AGE
tackle   117s
...
Several settings can be done in the Tackle.yaml including container settings, Red Hat Single Sign-On settings, and metrics. See the complete list here. For container settings, for example, see the list below:
### Hub:
hub_container_limits_cpu: "1"
hub_container_limits_memory: "2Gi"
hub_container_requests_cpu: "500m"
hub_container_requests_memory: "1Gi"
### SSO database container:
keycloak_database_container_limits_cpu: "500m"
keycloak_database_container_limits_memory: "800Mi"
keycloak_database_container_requests_cpu: "100m"
keycloak_database_container_requests_memory: "350Mi"
### SSO container:
keycloak_sso_container_limits_cpu: "1000m"
keycloak_sso_container_limits_memory: "2Gi"
keycloak_sso_container_requests_cpu: "300m"
keycloak_sso_container_requests_memory: "600Mi"
### UI container:
ui_container_limits_cpu: "500m"
ui_container_limits_memory: "800Mi"
ui_container_requests_cpu: "100m"
ui_container_requests_memory: "350Mi"
### Analyzer:
analyzer_container_limits_cpu: "1"
analyzer_container_limits_memory: "1Gi"
analyzer_container_requests_cpu: "1"
analyzer_container_requests_memory: "512Mi"
### Provider Java container:
provider_java_container_limits_cpu: "1"
provider_java_container_limits_memory: "4Gi"
provider_java_container_requests_cpu: "1"
provider_java_container_requests_memory: "4Gi"
Regarding Migration Toolkit for Application—to access MTA Console, get the MTA route as below:
$ oc get route
NAME   HOST/PORT                                                               PATH   SERVICES   PORT    TERMINATION     WILDCARD
mta    mta-openshift-mta.example.com          mta-ui        edge/Redirect   None
From the above, one can deduce the access the MTA Console: https://mta-openshift-mta.example.com/applications, given https://
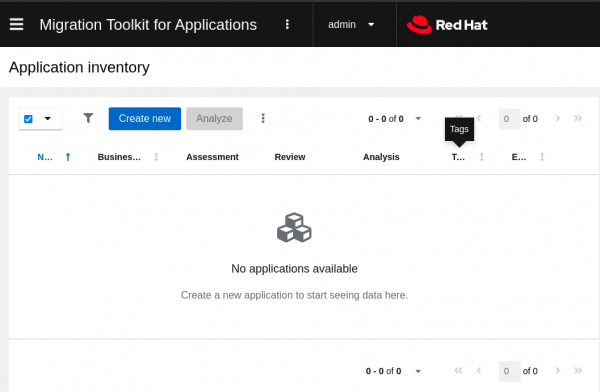
The default user will be admin and the default password will be Passw0rd!. On the first log in, the passcode will need to be changed. Then, the console will open with the Migration option on the MTA Console page, as shown in Figure 3.
MTA analysis
Let’s now analyze a few examples.
Example analysis
On MTA’s main Migration page—which is the default as shown above—below the Application inventory, click Create new and proceed to fill in details on the application. The application might be an actual binary file, such as .jar or a GitHub source, for example. This provides more flexibility in case the application is not yet built.
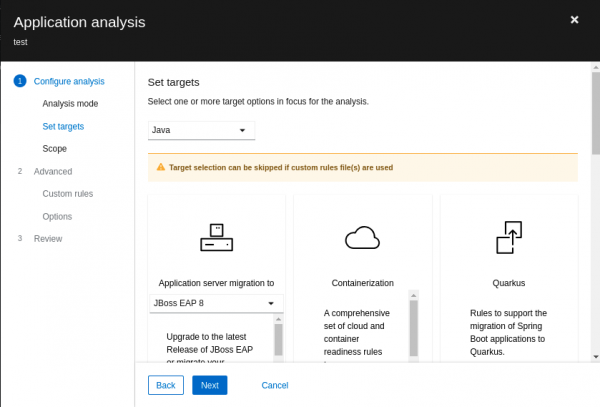
Then click Analyze at the top menu on the side of Create new and provide the specific Analysis mode, targets, and Scope. It is on the Analyze part where the user adds custom rules (for details on how to write custom rules, see the Rule Development Guide). Example analysis details are shown in Figure 4.
The analysis will start and the Analysis section will change to Scheduled -> In-progress -> and then Completed (green mark). See Figure 5.
Report analysis
After the deployment is analyzed and the analysis is completed, the user can do a review. The MTA console user interface will populate the result of the report. If you click the Issues tab and select your given application, you can view the analysis result. Another option is to download the static version of the report if desired, however, viewing it in the UI allows a more dynamic ability to view the data.
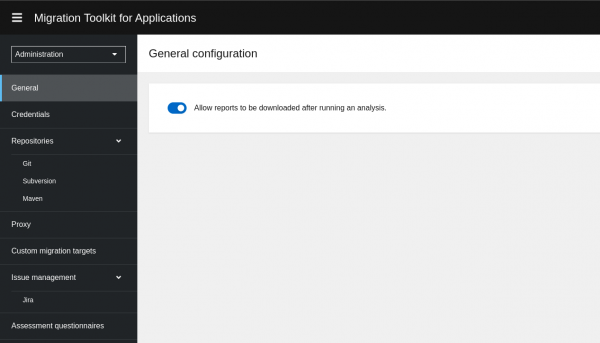
To download the report, go to the MTA Administration (/general). The report will be downloaded as a .tar file, upon the index.html.
Figure 6 depicts the Issues tab vs. the index report in a comparative view.
MTA output, as described in this solution, will create the output directory, including the index.html with the application name, tags, incidents, and story points.
Story points
The report will include an overview and the story points for migration. MTA output will classify the changes to be done in story points, as in Scrum/Kanbam story points, and classify the changes as mandatory vs. optional vs. potential. Those story points come from a relative measurement of the difficulty in implementing a certain change/update, which can be as trivial as 1 story point, or up to 10+ story points, which are very difficult tasks. Stories are relatively estimated (i.e., 9 is 3 times as much as 3) and measure time for doing certain tasks.
MTA seems to use a classification sequence from 1 onwards, not skipping any number of points nor bringing a Fibonacci clarification for example. In some cases the number of story points is 0, meaning the migration does not require time, but this will be on a case-by-case basis.
Incidents are classified as mandatory, optional, and potential.
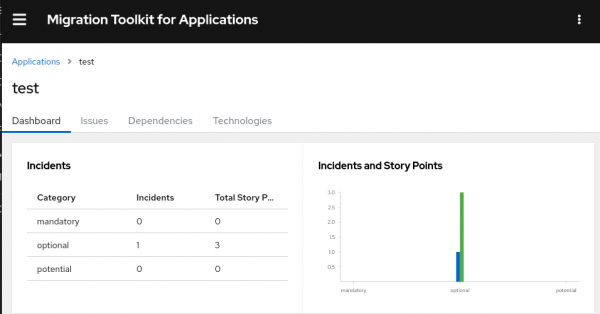
For example, the application test has mostly optional changes with 1 to 3 story points as per the report (Figure 7).
In the example above, one can see the test application has one optional Incident with 3 story points.
JBoss EAP 7 to JBoss EAP 8 migration
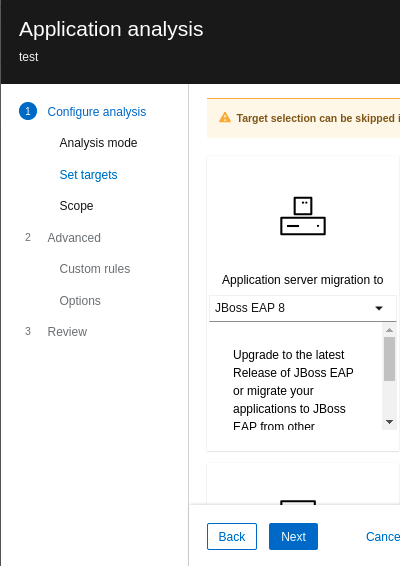
For JBoss EAP 7 to JBoss EAP 8 migration, navigate to the Configure analysis tab then click Set targets and select the target JBoss EAP 8, as shown in Figure 8.
Report analysis in-depth
Click the application name, then go to the Dashboard so you can see the classification of the incidents (i.e., the actual changes that must be done). You will have a graph of the incidents vs story points, as explained above.
Going from left to right you have:
- Dashboard: Graphs for incidents vs. stories points.
- Issues: Complete list of libraries and incidents vs story points level.
- Dependencies: List of dependencies jars, with versions, sha1 ahs, vendor, and path.
- Technologies: A nice overview of the technologies in the application already classified.
MTA settings
As explained in the Migration Toolkit for Applications (MTA) Guide, the user interface has two views:
- Administration view:
https:///general - Migration view:
https:///applications
Upon opening MTA’s main page using /applications, the MTA Migration page will open. However, for MTA Administration duties, select Administration or open directly at /general page. Figure 9 depicts what will open.
On this Administration page, you can view details and carry out operations such as allowing the report to be downloaded (which is very useful), credentials, Repositories, custom migration paths, Issue management, and Assessment questionnaires.
Red Hat Single Sign-On settings
As explained in the MTA 7 User Interface Guide, MTA delegates authentication and authorization to the Red Hat Single Sign-On instance, which is installed by the MTA Operator. Therefore, in terms of advanced settings, direct access to Red Hat Single Sign-On for fine-tuning/adjusting settings rather than the MTA Administration Console (accessed via https://).
In terms of management, given MTA Operator installs the Red Hat Single Sign-On Operator and creates one Keycloak Custom Resource (CR). Then it creates a dedicated realm, called MTA realm, that contains all the roles and permissions that MTA requires. In the matter of CRs, although the Red Hat Single Sign-On provides other CRs, no other Custom Resource will be created by the MTA Operator:
$ oc get keycloak
NAME        AGE
mta-rhsso   44m
...
$ oc get KeycloakRealm
No resources found in openshift-mta namespace.
$ oc get KeycloakBackup
No resources found in openshift-mta namespace.
$ oc get KeycloakClient
No resources found in openshift-mta namespace.
All administration processes in SSO should be done directly in SSO and to do that open the main route and access the SSO Console as below:
- MTA Console UI (migration):
https://./applications - MTA Console UI (administration):
https://./general - SSO Admin Console UI:
https://route>/auth/admin(this will be the SSO Admin console). - SSO documentation and SSO Admin console:
https://./auth
Specific example
To access the Red Hat Single Sign-On Console, follow the route below:
$ oc get route
NAME   HOST/PORT                                                               PATH   SERVICES   PORT    TERMINATION     WILDCARD
mta    mta-openshift-mta.example.com          mta-ui        edge/Redirect   None
From the above one can deduce the access to Red Hat Single Sign-On Console as: https://mta-openshift-mta.example.com/auth/admin.
To access the Red Hat Single Sign-On console, get the user and credentials below:
oc get secret credential-mta-rhsso -o yaml
apiVersion: v1
data:
 ADMIN_PASSWORD: SOMETHING== <--- passcode
 ADMIN_USERNAME: YWRtaW4=    <--- this is the hash for admin
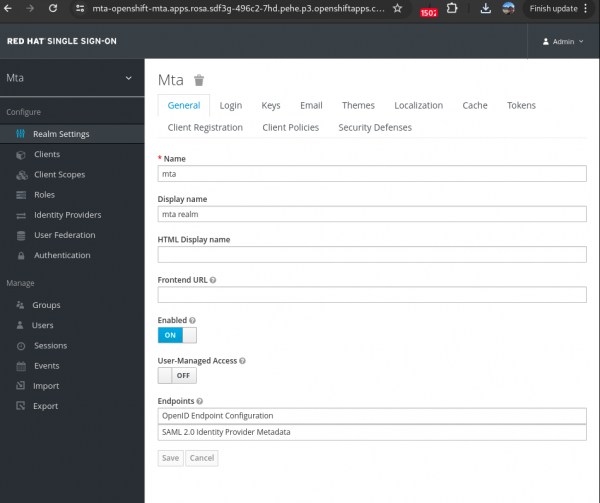
The SSO Main console will appear, which will be the Mta realm (instead of Realm Master). See Figure 10.
Example of customizations
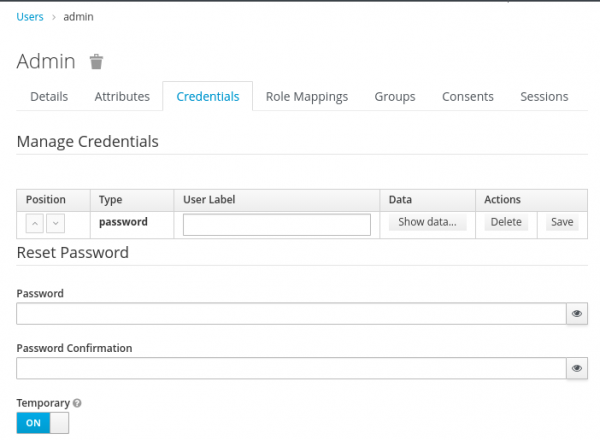
Change the admin passcode directly in SSO: go into Manage -> Users -> View all users -> Select the first ID (username admin) -> Actions -> Edit -> Credentials (Figure 11).
Next, we want to integrate SSO with GitHub. It is beneficial to integrate with GitHub, and to do that, use Red Hat Single Sign-On GitHub Client, which can be done directly at the Identity Providers section:
- Go to the Red Hat Single Sign-On main page.
- Select Identity Providers in the left side menu.
- Select Add provider on the corner right.
- Select Social -> Github.
- Update the GitHub Client with specific details.
- Go to the realm log in page and see the GitHub button to log in.
Figure 12 shows an example.
Troubleshooting steps
Although not directly related to customization, but also very relevant in terms of approaches in case of issues for troubleshooting purposes, the following data will be relevant in case a support case is required:
- The Tackle Custom Resource, although trivial in some situations, can be customized:
$ oc get tackle -o yaml > tackle.yaml. - The inspect from the
openshift-mtanamespace:$ oc adm inspect ns/namespace_name. - The analysis YAML can be found in the Application inventory -> Application -> Analysis details.
Example:
id: 1
        createTime: 2024-07-03T17:59:59.395884214Z
        name: test.1.windup
        addon: analyzer
        data:
            mode:
                artifact: ""
                binary: false
                withDeps: true
            rules:
                labels:
                    excluded: []
                    included:
                        - konveyor.io/target=cloud-readiness
MTA 7 version note
Above I discuss MTA 7, which is fairly different than MTA 6.x. MTA 7.0 brings considerable changes and combines the features that previously were split between the Migration Toolkit for Applications (MTA) and the Migration Toolkit for Runtimes (MTR). MTA 7 was released in Q1 2024, and the Migration Toolkit for Runtimes (MTR) will be moved to End of Life in September 2024.
Therefore, for the Migration Toolkit for Runtimes (MTR) use cases, Red Hat ships the Migration Toolkit for Applications (MTA) CLI for example, which replaces the use case, such as JBoss EAP 8 migration. MTA CLI does not require OpenShift installation given it is not an OCP Operator. Instead, in terms of utilization, MTA 7.1 CLI is a containerized solution run via podman (or dockerfile) and the next version, MTA 7.2 will support containerless and container mode; However, it will default to containerless for Java analysis, similar to MTA 6.x used to run – meaning it will need to run Java and Maven locally installed locally.
Conclusion
The article describes the usage of MTA CLI and MTA Operator by going through installation, usage, and report analysis. Finally, it covers the customization part in Red Hat Single Sign-On that is integrated already by Red Hat’s Migration Toolkit for Application (MTA), which provides an accessible and powerful tool for a series of migration targets such as application migration for the cloud or JBoss EAP server 8/OpenJDK migration.
The rules that make the migration paths can be customized and the Rule Development Guide is an excellent reference to how to customize them. The customization section about MTA and Red Hat Single Sign-On is also explained with some use cases. Finally, some data related to troubleshooting were explained, which can be useful for case handling.
Additional resources
To learn more about the MTA Operator and MTA plug-ins click here. For Migration Toolkit for Runtime (MTR) see this reference, as again, Migration Toolkit for Runtime (MTR) is already End of Life.
In terms of OpenJDK migration, to learn more read Java 17: What’s new in OpenJDK’s container awareness. For container awareness, see the main article How to use Java container awareness in OpenShift 4. For more information on Red Hat Single Sign-On settings, see Red Hat Single Sign-On 7.6.
For any other specific inquiries, please open a case with Red Hat support. Our global team of experts can help you with any issues.
Special thanks to Dylan Murray and Sherman Horton collaboration on MTA issues from the Product engineering side throughout the years. Also outstanding contributions from Santoshi Atmakuru for the SSO interaction section. Finally Pedro Silva, and Wagner Queiroz for day-to-day Red Hat Single Sign-On and migrations issues/discussions, and Will Russell, for the review of this article.

