

If you have already installed VuPlayer, a great free and open-source audio player available on Github to download for Windows, you might be looking for a way to remove it. That’s why you are here in this article; the reason to uninstall VuPlayer from your Windows 11 can be any, but the steps to do that are the same as for any other software.
Nevertheless, for those who are new to Windows 11, then let us explain the step-by-step methods available to remove applications or packages from the latest Windows operating systems, including the previous version, i.e., Windows 10, in case you’re struggling to remove VuPlayer completely, remove leftover files, and clean up your system.
Quick Summary: How to Uninstall VuPlayer on Windows 11
Want a quick answer? Follow these simple steps:
1️⃣ Open Windows 11 or 10 Settings (Win + I) → Go to Apps → Click Installed Apps.
2️⃣ Find the installed VuPlayer, click Uninstall, and confirm.
3️⃣ Follow the on-screen instructions to remove it.
4️⃣ Restart your PC to complete the process.
5️⃣ Remove leftover files (%appdata%) and clean up the Windows Registry (regedit).
✅ VuPlayer is now completely uninstalled from your system! 🎉
Method 1: Uninstall VuPlayer via Windows Settings (Recommended)
The easiest way to remove any application, including VuPlayer, from Windows 11 is by using its “settings” menu. To see how to open it and then use it further to manage apps, check out the given steps:
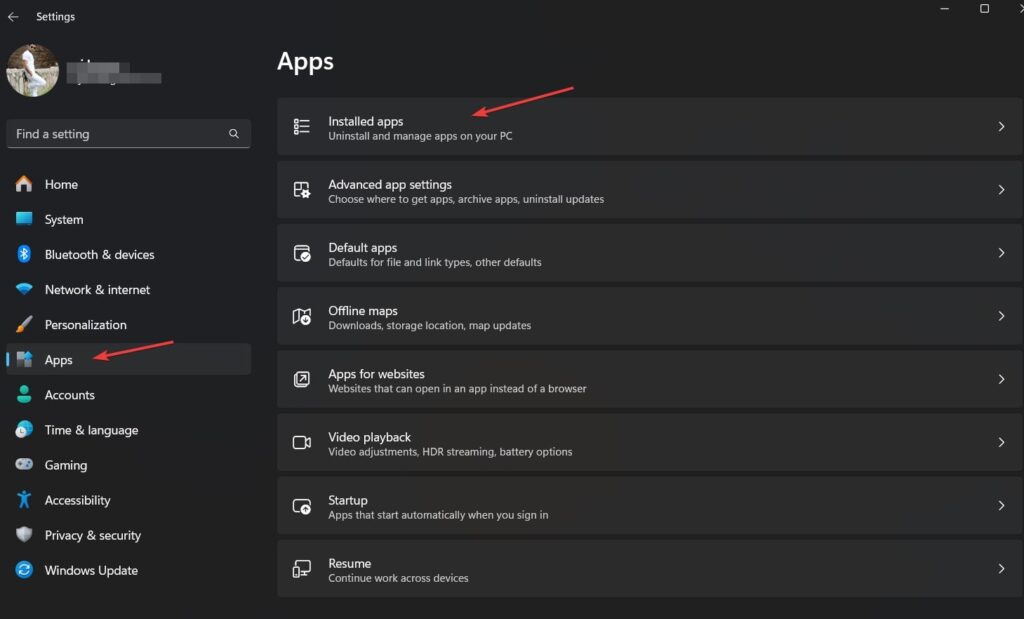
Step 1: Open Windows 11 or 10 Settings
- Press
Win + Ishortcut on your keyboard to open Windows Settings. - Click on the Apps option from the left panel.
- After that, select the Installed Apps option from the right-side panel.
Step 2: Locate and Uninstall VuPlayer
- You will see the search bar; type VuPlayer to find it there.
- Click the three-dot menu (…) next to the VuPlayer searched result.
- Select Uninstall and confirm the action.

Step 3: Restart Your Computer (optional)
- Once done, the VuPlayer will be removed from your system altogether. However, you can restart your PC to finalize the uninstallation.
- This ensures that all processes related to VuPlayer are entirely removed.
Method 2: Uninstall VuPlayer Using Control Panel
If you don’t want to use the modern way to remove the applications from Windows 11, then we can go for the legacy one using Control Panel to uninstall VuPlayer and other apps if they appear in Windows Settings.
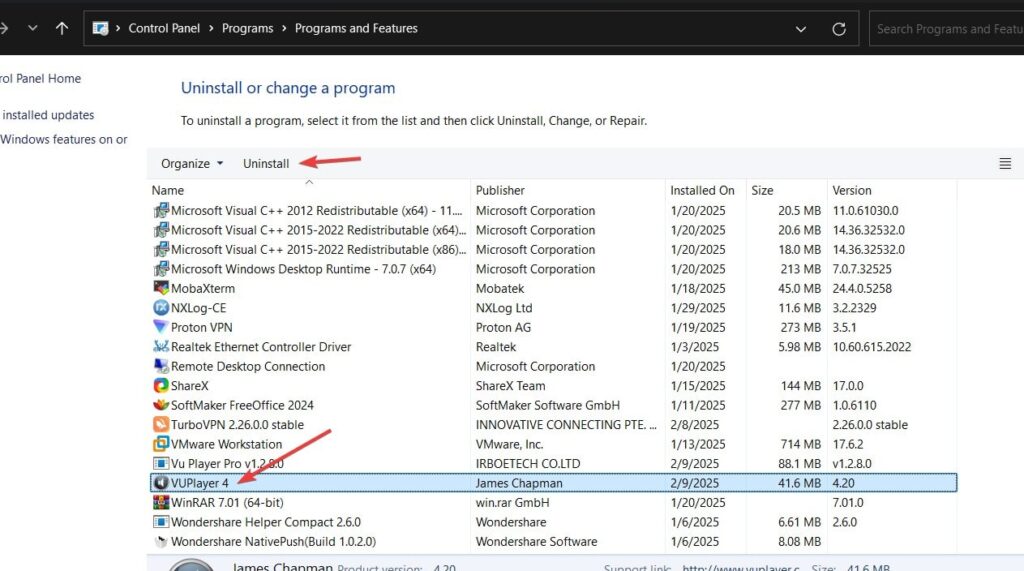
Step 1: Open Control Panel
- Press
Win + R, typeappwiz.cpl, or directly search for Control Panel in the Windows search box and select its icon when it appears after that Program. - This opens the Windows Programs Uninstall feature.
Step 2: Find and Remove VuPlayer
- Scroll through the list of installed programs and locate VuPlayer.
- Click on it and select Uninstall.
- Follow the uninstallation wizard instructions.
Step 3: Restart Your PC
After the uninstallation process, restart your computer.
Method 3: Use a Third-Party Uninstaller (For Stubborn Cases)
In case, due to any problem, you are not able to remove the vuPlayer using any of the given methods above; then users can go for a third-party uninstaller such as:
✅ Revo Uninstaller – Best for deep cleaning residual files.
✅ IObit Uninstaller – Great for batch uninstalling apps.
✅ Geek Uninstaller – Lightweight and effective.
How to Use a Third-Party Uninstaller
- Download and install the uninstaller of your choice.
- Open the software and scan for VuPlayer.
- Click Uninstall and let it remove all associated files.
- Restart your PC after the process.
How to Remove VuPlayer Leftover Files (Manual Cleanup)
Even after uninstalling VuPlayer, some leftover files and registry entries may remain. Here’s how to manually delete them.
Step 1: Delete Leftover Files
- Press
Win + R, type%appdata%, and hit Enter. - Locate and delete the VuPlayer folder (if found).
- Navigate to:makefileCopyEdit
C:\Program Files\VuPlayer\ C:\Users\YourUsername\AppData\Local\VuPlayer\ - Delete any VuPlayer-related folders.
Step 2: Remove VuPlayer Registry Entries (Advanced Users Only)
⚠ Warning: Editing the Windows Registry can cause system issues. Proceed with caution!
- Press
Win + R, typeregedit, and hit Enter. - Navigate to these locations:
HKEY_CURRENT_USER\Software\VuPlayer HKEY_LOCAL_MACHINE\SOFTWARE\VuPlayer - If you find VuPlayer entries, right-click and delete them.
- Close the Registry Editor and restart your PC.
✅ VuPlayer and all its traces should now be removed entirely!
🔹 FAQ (Frequently Asked Questions)
1️⃣ Why can’t I uninstall VuPlayer on Windows 11?
If VuPlayer does not appear in Installed Apps, try using Control Panel or a third-party uninstaller. Some software may not entirely remove itself through the standard uninstall process.
2️⃣ Does VuPlayer leave behind leftover files after uninstallation?
Yes, some app data and registry entries may remain. Follow the manual cleanup steps above to remove them completely.
3️⃣ What are the best alternatives to VuPlayer?
If you’re looking for a better music player, try:
✅ Foobar2000 – Lightweight and customizable.
✅ MusicBee – Feature-rich and great for organizing large libraries.
✅ AIMP – Great audio quality and supports multiple formats.
4️⃣ How do I make sure VuPlayer is completely removed?
- Check Installed Apps in Windows Settings (
Win + I). - Use a third-party uninstaller like Revo Uninstaller.
- Manually delete leftover files (
%appdata%& registry entries).
🔹 Final Thoughts
Uninstalling VuPlayer on Windows 11 is easy if you follow the proper steps. Select the one method according to your needs, and also let us know 💬 Did these steps work for you?
🔹 Settings App – Best for quick removal.
🔹 Control Panel – Alternative method.
🔹 Third-Party Uninstallers – Best for deep cleaning.
🔹 Manual Cleanup – Advanced users can remove residual files.


