
Quality of Service (QoS) plays a vital role in managing bandwidth on a network. It ensures that needed applications get priority in consuming data and performing well. It also minimizes latency issues. You may already have heard this term while buying routers, especially the high-end ones that have the quality of service to enhance the Gaming application’s network performance automatically.
But how can we check that the QoS works correctly according to the policies and other network performance activities? Here, the iPerf3 comes into the picture. It is a wide-user tool for testing and tuning network performance by measuring bandwidth, latency, jitter, and packet loss.
If you are a Windows 11 user, this guide will discuss installing iPerf3 and using it with QoS.
Why Use iPerf3 with QoS?
Testing QoS settings using iPerf3 helps to:
- Verify if QoS policies are correctly applied.
- Measure network performance under different priority settings.
- Ensure critical applications receive the required bandwidth.
- Identify potential bottlenecks in the network.
Prerequisites
Before proceeding, ensure the following:
- A Windows 11 PC with Administrator access.
- iPerf3 on both the client and server machines.
- QoS policies, configured via Group Policy Editor or PowerShell.
- Two devices on the same network for proper testing.
Step 1: Install iPerf3 on Windows 11
There are two ways to install iPerf3: manually downloading it from its official website or using the Windows package manager. Here, we discuss the package manager method, which is easy.
To install iPerf3, follow these steps:
- Open the Command Terminal as Admin. To do so, right-click the Windows 11 or 10 Start button and select the Terminal (Admin) option.
- Type the given command:
winget install "iPerf3" - Once the installation is completed, close and open your Terminal again to refresh the current session. To verify the installation Is completed successfully, let’s check the iperf version using the given command:
iperf3 -v
Step 2: Configure QoS in Windows 11
In this step, we create a custom policy for QoS on Windows, but why to do that? Because creating a QoS (Quality of Service) policy ensures that network traffic is prioritized based on predefined rules. To prioritize traffic using QoS, follow these steps:
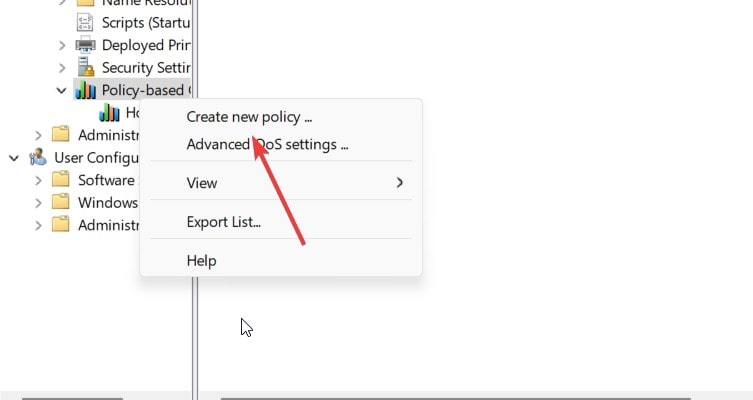
Method 1: Using Group Policy Editor
- Press Win + R, type
gpedit.msc, and hit Enter. - Navigate to Computer Configuration -> Windows Settings
- Select Policy-based QoS, right-click on it, and then select Create a new policy option.
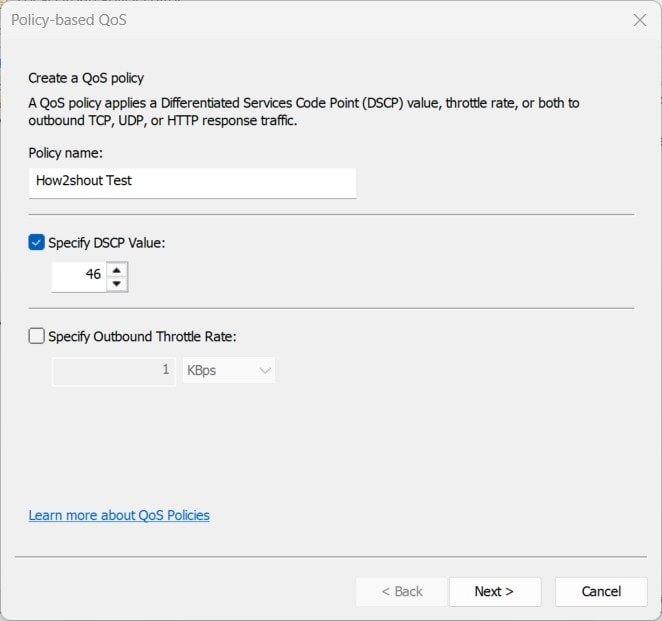
- Enter a policy name, check Specify DSCP value, and set a value (e.g.,
46for high-priority traffic). Note: Higher DSCP values (e.g., 46 for VoIP) get prioritized over lower values (e.g., 10 for background downloads).
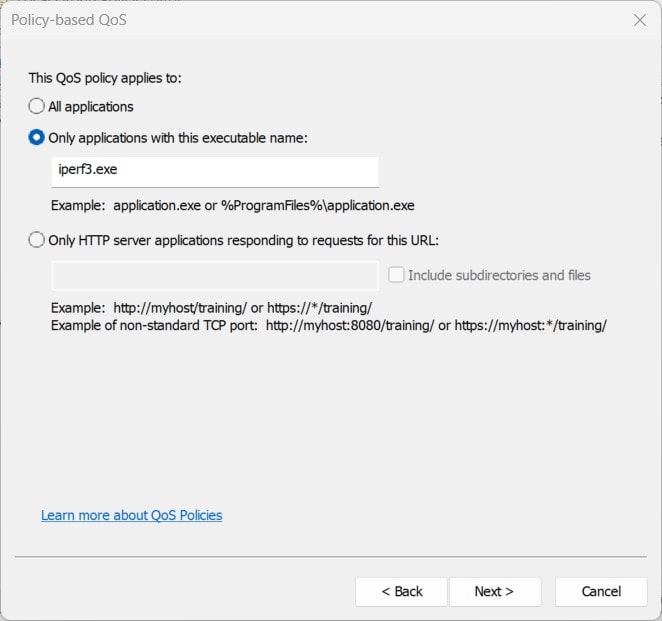
- Specify the application name (
iperf3.exe) to apply QoS.
Click Next, follow the rest of the wizard, apply settings, and restart your system.
Note: If multiple QoS policies target the same application but with different DSCP values, the last applied policy usually takes effect. You can create separate QoS policies for different applications without conflicts.Example:
- File Downloads: DSCP
10(low priority). - iPerf3: DSCP
46(high priority). - YouTube Streaming: DSCP
34(medium priority).
Method 2: Using PowerShell
If you don’t want to go through the graphical wizard like we did above to create QoS policy, then you can use the PowerShell as well; here is the command to apply a QoS policy:
New-NetQosPolicy -Name "iPerf3 QoS test" -AppPathNameMatchCondition iperf3 -DSCPAction 46To check and list the created policies, you can use:
Get-NetQosPolicyStep 3: Run iPerf3 Test with QoS
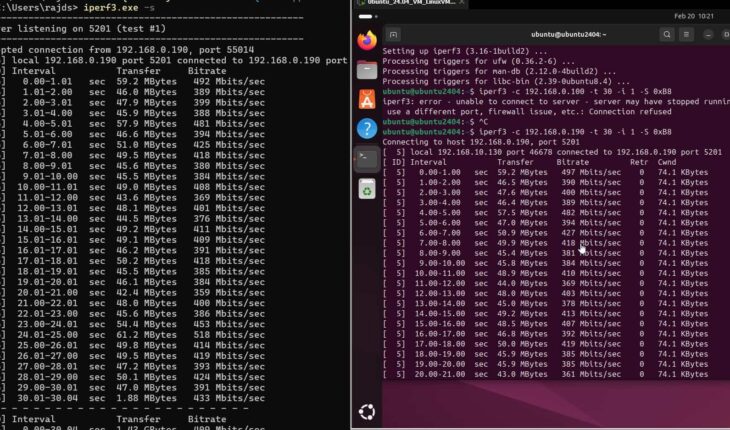
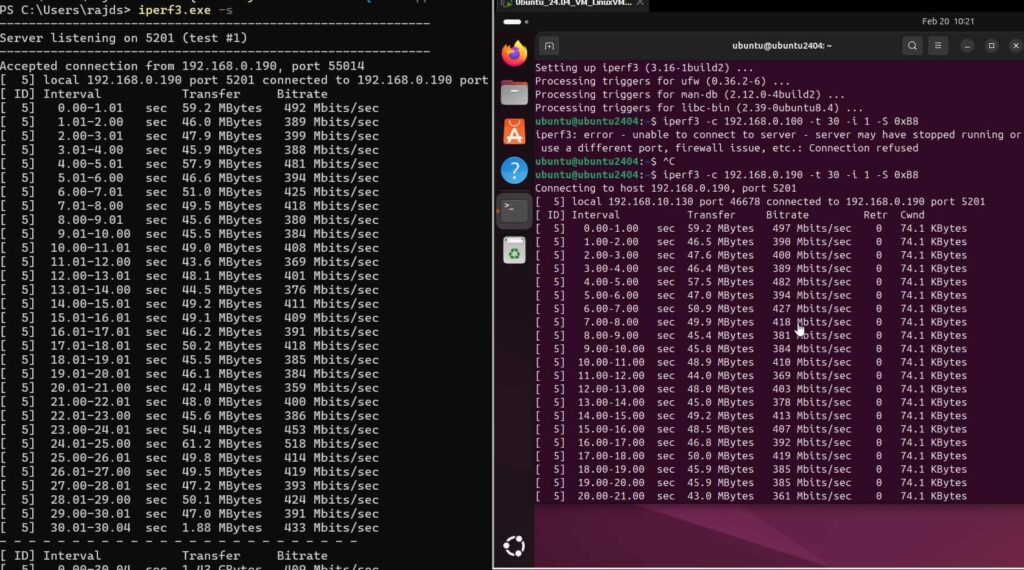
Start the iPerf3 Server
On the server machine, open CMD and run:
iperf3.exe -sRun the iPerf3 Client with QoS
On the client machine, execute the following command:
iperf3.exe -c -t 30 -i 1 -S 0xB8 -c: Specifies the server’s IP address.-t 30: Runs the test for 30 seconds.-i 1: Reports results every second.-S 0xB8: Sets the DSCP value (46) for QoS testing.
Testing Different DSCP Values:
| Traffic Type | DSCP Value (Decimal) | DSCP Value (Hex) | iPerf3 Command |
| Default Best Effort | 0 | 0x00 | iperf3.exe -c -t 30 -S 0x00 |
| Background Traffic | 10 | 0x28 | iperf3.exe -c -t 30 -S 0x28 |
| Streaming Media | 34 | 0x88 | iperf3.exe -c -t 30 -S 0x88 |
| VoIP (High Priority) | 46 | 0xB8 | iperf3.exe -c -t 30 -S 0xB8 |
| Network Control (Highest Priority) | 56 | 0xE0 | iperf3.exe -c -t 30 -S 0xE0 |
For example, If we use -S 0x28 (DSCP 10, Background Traffic), this traffic is expected to receive lower priority than other higher-priority flows.
Step 4: Analyze the Results
After running the test, iPerf3 will display results including:
- Bandwidth (Mbps)
- Packet loss (%)
- Jitter (ms)
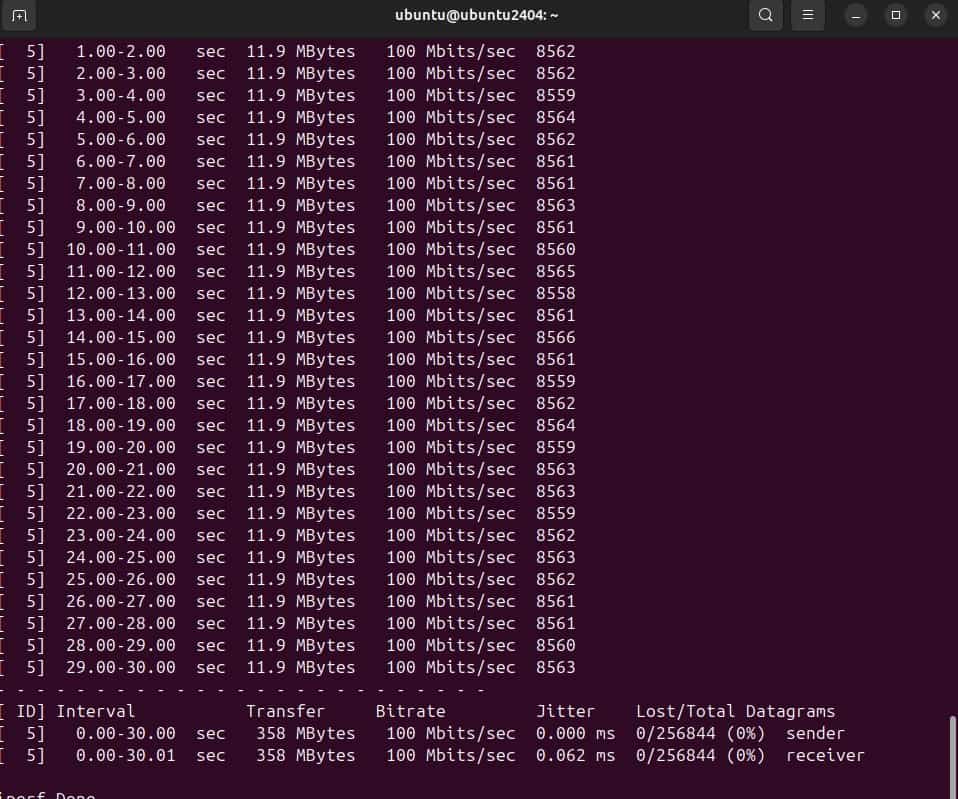
Since jitter and packet loss are only relevant in UDP traffic, you should run iPerf3 in UDP mode instead of TCP to get them.
iperf3 -c -u -b 100M -t 30 -S 0x28 -u→ Enables UDP mode.-b 100M→ Sets bandwidth to 100 Mbps (adjust based on your network).-t 30→ Runs the test for 30 seconds.-S 0x28→ DSCP setting (optional).
Tips:
To Delete All QoS Policies
Run the following command to remove all policies:
Get-NetQosPolicy | Remove-NetQosPolicy -Confirm:$falseConclusion
Following this guide, you can successfully test iPerf3 with QoS on Windows 11 to ensure your network traffic is prioritized effectively. Implementing QoS ensures better network performance for critical applications, reduces congestion, and improves overall connectivity.
✅ Key Takeaways:
- Install iPerf3 and configure QoS via Group Policy or PowerShell.
- Use iPerf3 to send traffic with specific QoS values.
- Analyze network performance to confirm QoS effectiveness.


