

Secure Shell (SSH) is the tool most developers and system administrators use to connect the hosting server or any cloud service remotely using Linux because SSH will be there out of the box. However, what about Windows? Yes, an SSH client will be present on the Microsoft operating system, but the Server package will not be. Therefore, this article will discuss quickly setting up an OpenSSH server package on Windows 11 or 10 using Winget command line package manager.
This tutorial specifically covers installing SSH using Winget, covering everything from what SSH is to why you need it and how to verify your installation.
What Is SSH, and Why Do You Need It?
SSH (Secure Shell) is a protocol for securely connecting to remote systems over an encrypted network. It is widely used for:
- Remote server access is needed to issue commands quickly and manage the system without physically accessing it.
- To perform file transfers encrypted using SCP and SFTP.
- Tunneling & port forwarding
Knowing how to install and use SSH is essential for working with Linux servers, cloud instances, or Git repositories.
What Is Winget?
Well, those are new to package managers. Winget is an open-source command line developed by Microsoft for Windows 10 and 11 systems. It allows users to install application packages from the CMD or PowerShell interface, removing the need to visit software websites and manually download them individually. For example, to install Google Chrome on Windows, we don’t need to visit its official website; we can run a single command of Winget, and it’s done. We can even upgrade or remove applications without manually downloading installers with just a single command.
In short, Winget makes it incredibly easy to install software. If you’re new to this tool, check out our Windows Package Manager for installing apps via a command guide.
Similarly, using Winget to install SSH is faster and ensures you get the latest official version without searching for downloads.
How to Install SSH Using Winget
Coming to the main topic of this tutorial, here are the steps to follow to install the OpenSSH server. Nevertheless, those who don’t want to use Winget can use the PowerShell command line to install the OpenSSH server.
Step 1: Open PowerShell or Command Prompt
We need admin access to install the applications; therefore, we must start the command prompt or powershell with administration privileges. To do this, right-click the Windows Start button and click the Terminal (Admin) or Windows PowerShell (Admin) option.
Step 2: Search for the OpenSSH package
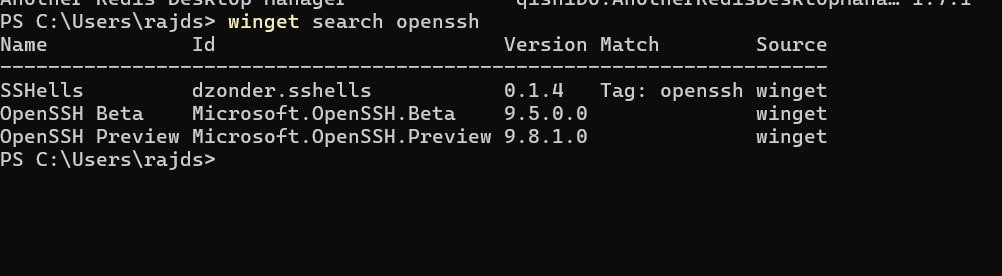
We first need to confirm whether the OpenSSH package is available through the Winget repository or not; hence, in your Command Terminal, type:
winget search opensshAs shown in the screenshot, there are two related packages to our query. Here, we will install the Beta version.
Step 3: Run the Winget SSH Installation Command
With the help of the previous step’s command, we know the exact APP ID of the package we want to install. Hence, let’s use the “winget install” command to get the OpenSSH Beta package.
winget install Microsoft.OpenSSH.BetaThis command does the following:
- Fetches the Microsoft OpenSSH package.
- Installs the latest available version from the Winget repository.
- Ensures the package is installed correctly without manual downloads.
Step 3: Verify SSH Installation
Once the installation completes, check if SSH is installed by running:
ssh -VThis should return the installed SSH version, confirming a successful installation. Also, Winget isn’t just for SSH—it can install various applications. For example, you can use Winget to install software like 7-Zip with a simple command or productive tools like Microsoft Team.
How to Enable and Start SSH on Windows
Installing SSH is only part of the process. You must enable and start the SSH service to use SSH as a Windows 10 or 11 server.
Step 1: Enable SSH Service
Run the following command in PowerShell to enable SSH. This will ensure that SSH starts automatically whenever you boot your PC.
Set-Service -Name sshd -StartupType AutomaticStep 2: Start or Stop the SSH Service
Now, to start or stop the SSH server service on Windows manually using the PowerShell, here are the commands
To manually start the SSH server, type:
Start-Service -Name sshdIf you need to stop SSH, use:
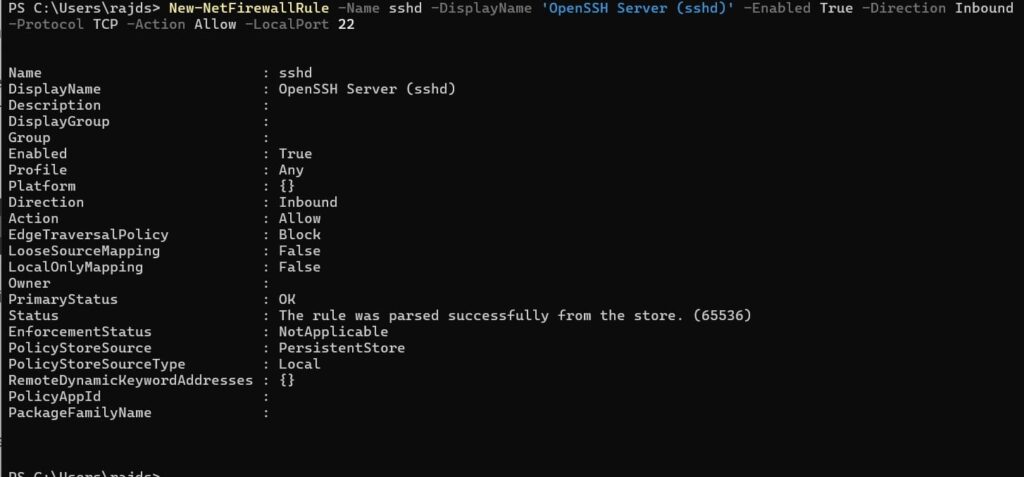
Stop-Service -Name sshdStep 3: Allow SSH Through Windows Firewall
By default, SSH port 22 is allowed to communicate through the Windows Defender Firewall; however, if not, we can use the given command to open it. This will allow remote connections via SSH.
New-NetFirewallRule -Name sshd -DisplayName 'OpenSSH Server (sshd)' -Enabled True -Direction Inbound -Protocol TCP -Action Allow -LocalPort 22Now, your system is ready to accept SSH connections!
How to Use SSH on Windows 10 or 11
So far, we have discussed the installation process of the SSH server using Winget. Let’s see some basic use cases:
1. Connect to a Remote Server
Once you have SSH, we can use it for securely connecting to a server using SSH on Windows, whether it’s a Linux VPS or a cloud instance (like AWS, Azure, or DigitalOcean), here is the example to use SSH to log in:
ssh username@your-server-ipFor instance, if your server IP is 192.168.1.100 and your username is admin, run:
ssh [email protected]If it’s your first time connecting, you’ll see a fingerprint confirmation—type yes to proceed.
2. Transfer Files Securely Using SCP
Want to transfer files between your Windows machine and a remote server? Use SCP:
scp myfile.txt user@remote-ip:/home/user/This securely copies myfile.txt to the remote machine’s /home/user/ directory.
3. Create an SSH Key for Passwordless Login
Instead of typing passwords every time, you can use SSH keys:
Generate SSH Keys on Windows
Run this command in PowerShell:
ssh-keygen -t rsa -b 4096 -C "[email protected]"Then, copy your key to the remote server:
ssh-copy-id user@remote-ipNow, you can log in without typing your password!
Troubleshooting SSH Installation Issues
If you run into problems, here are some fixes:
1. Winget Command Not Found
If winget isn’t recognized, ensure you have Windows 10 (version 1809+) or Windows 11. If missing, install the App Installer package from the Microsoft Store.
2. SSH Command Not Found
If ssh isn’t working after installation, restart your PC or manually add SSH to your system’s PATH variable:
setx PATH "%PATH%;C:\Windows\System32\OpenSSH"Then, restart PowerShell and try ssh -V again.
3. SSH Service Not Starting
If SSH doesn’t start, run:
Get-Service sshdIf it’s stopped, restart it with:
Start-Service sshFinal Thoughts
Installing SSH on Windows using Winget is simple and can be done in a single command, as seen in this article. Once you have configured the SSH fully on Windows 11 or 10, it will become easy to manage cloud servers using Git or automate tasks. Those looking for an alternative solution can try SSH tunneling or configuring SSH with Windows Subsystem for Linux (WSL), which is easier and more flexible, especially if you are familiar with Ubuntu Linux commands.


