
Can we upgrade all our Windows-installed applications using a single command like Linux? The answer is yes, and the solution is Winget.
In this fast-moving world, keeping our system-installed software up-to-date is crucial for system compatibility and security. However, if you have a long list of apps, then going through them individually and finding which one needs an update is tedious and time-consuming. What do you think? If your answer is YES, keep reading this article because you will find a solution for this problem using a Microsoft Windows Package manager called Winget.
It offers a streamlined way to manage application updates directly from the command prompt or PowerShell. This guide will walk you through using the ‘winget upgrade all’ command to update all your applications simultaneously, ensuring your system remains current without manual checks.
Understanding the Windows Package Manager (winget):
The Windows Package Manager, or Winget, is a command-line tool designed to run only Windows 10 and 11 operating systems. So, if you are still using some older version of Microsoft Windows, this article is not for you. For a long time, Windows users, especially those in the system administrative field, longed for a package manager that could search, install, upgrade, and configure the applications with the help of a command prompt or Powershell. As a result, Microsoft came up with the Winget solution.
It is an open-source Windows package manager whose source code is available on GitHub. Users can automate app management tasks, reducing the time and effort required to maintain an updated system.
Setting Up Winget on Your Windows 10/11 System:
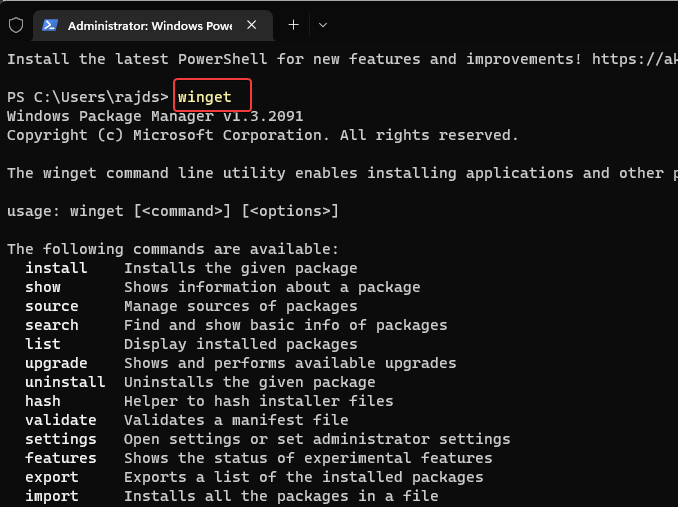
To start using Winget to update the applications, we first need to verify the Winget installation to confirm whether we have it or not
- Windows 10 Users need to ensure that their system is up to date because older versions of Windows 10 don’t provide Winget packages out of the box. Even after updating the system, if it is still unavailable, you must manually download the Winget App Installer package, which can be obtained from the Microsoft Store if it is not pre-installed.
- Windows 11 Users: Winget comes pre-installed.
To verify if Winget is installed:
- Open the Start menu and type
cmdand select “Run as Administrator” to open the Command Prompt with admin rights. - Type
winget --versionand press Enter.
If installed, the version number will be displayed. If not, download and install the App Installer from the Microsoft Store.
Use the ‘winget upgrade’ Command to update Windows apps
Once you are sure that your Windows 11 or 10 system has the working Windows package manager, list all the applications installed on the system that require an upgrade.
- Use this command to get a list of applications available with pending updates that must be upgraded.
winget upgrade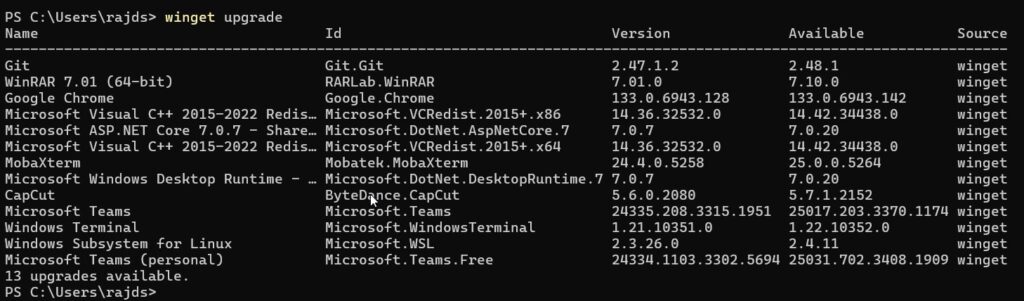
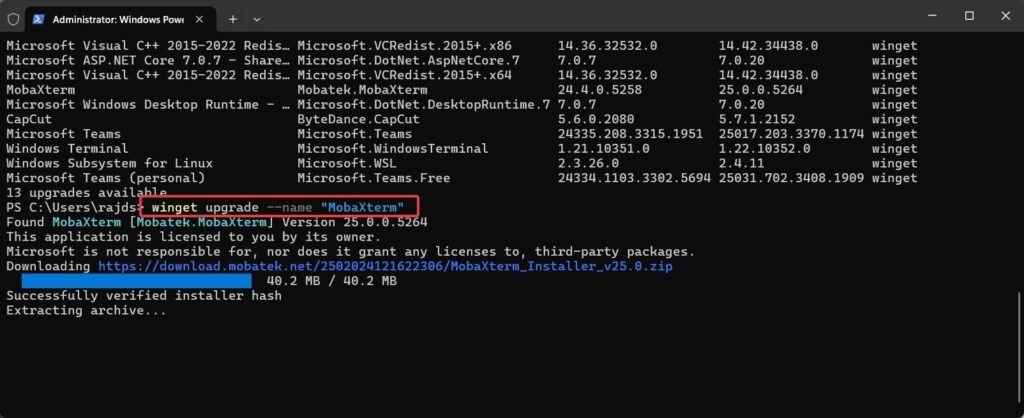
- To update a specific application:
winget upgrade --name "ApplicationName"Replace “ApplicationName” with the exact app name you wish to update. If you want to know how to install apps using Winget, learn from this example – the command to install Autokey via this package manager.
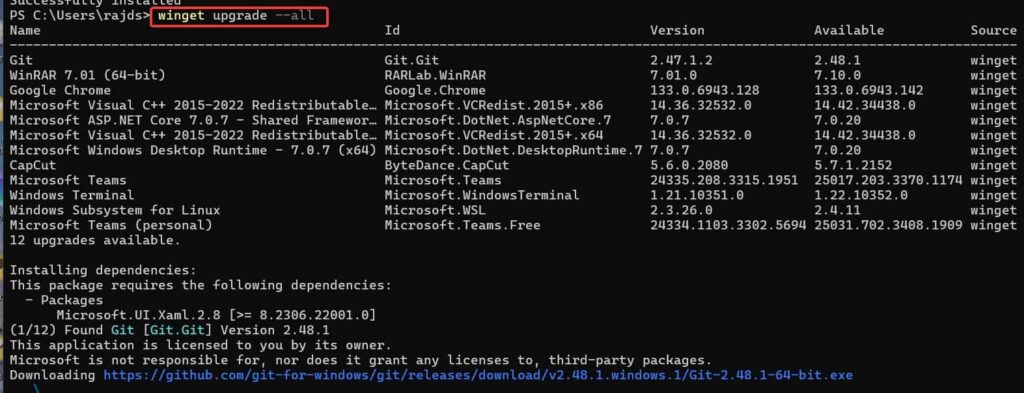
Updating All Applications with ‘winget upgrade –all’
We have already seen the syntax to list applications and how to update any of them individually. Now, let’s see the command that can update all installed applications simultaneously on Windows 11 or 10 with the help of Winget.
winget upgrade --allThis command initiates the update process for all apps with available updates immediately after executing. So make sure you want to do that. Also, some applications may require user interaction during the update process.
Troubleshooting Common Issues:
If you get an error that says “Failed in attempting to update the source: winget” after running the update command, this indicates a problem with the package source. A standard solution to this error is forcing the Winget to reset the source. Here is the command to use:
This command resets the package sources to their default state.
winget source reset --forceIssue: ‘winget upgrade –all’ not updating applications as expected.
Well, make sure you have administrative privileges when running the command. Right-click on Command Prompt and select “Run as administrator.”
Benefits of Using Winget for Application Management:
Efficiency: Update all your applications with a single command, hence saving time.
Automation: Developers can add the winget commands into scripts for automated maintenance.
Consistency: Maintain a uniform environment across multiple systems.
Frequently Asked Questions (FAQs):
A1: Yes, Winget is compatible with Windows 10, provided you have the latest version of the App Installer package.
A2: Open the Command Prompt with administrative privileges and use the winget upgrade command to list and update applications.
A3: Ensure you have administrative rights and your package sources are correctly configured. Use winget source reset --force to reset sources if needed.
Conclusion:
Of course, manually updating applications one by one is time-consuming, but by utilizing the “Winget upgrade—-all” command, we can streamline this process and enhance security and performance. I hope you now know how to use Winget to upgrade applications on Windows 11 automatically; nevertheless, if you face any problems, the comment section is all yours!!


