Whether you’re a first time user or a seasoned pro, these easy workflow hacks will help you level up in Autodesk AutoCAD.
Do you consider yourself an AutoCAD wizard? Do you open it a few times a month and ignore it otherwise? Or did you just boot it up for the first time last week and don’t know where to start?
No matter your experience or skill with Autodesk AutoCAD, you can always improve your chops. We’ve compiled this list of 23 AutoCAD tips and tricks to help every user work smarter and faster.
Quickly get help with an AutoCAD command
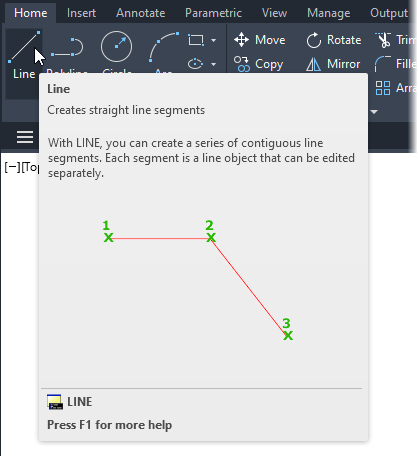
As you hover over a command in the ribbon, AutoCAD displays a tooltip. It shows the name and a summary for the command, its keyboard shortcut, and in many instances a picture or video. With the tooltip visible, pressing F1 launches the help navigating directly to the section about the command. You will not find a faster way to get specific command help.
Master the keyboard to master AutoCAD
The first release of AutoCAD was in 1982, and as it was DOS-based, it relied on keyboard shortcuts to supplement the menus. Current AutoCAD users still benefit from keyboard input.
You can start any AutoCAD command by typing it into the command line. The most frequently used commands have one to three-letter shortcuts. For example, you can use L to start a line, C for a circle, REC for a rectangle, and ST for text styles.

Starting commands via shortcuts is generally quicker than the alternatives. Also, you can keep your focus on the drawing as opposed to navigating menus, palettes and toolbars looking for commands.
Mastering the essential keyboard shortcuts will increase your efficiency. Focus on the commands you use most often.
Spacebar to repeat a command
In AutoCAD, the spacebar functions as the enter key. The spacebar is simpler to find and easily pressed with your thumb. It also repeats the last command, a simple but versatile shortcut.
Autocomplete to start the command
To help with keyboard entry, use the Input Search options. Although enabled by right-clicking in the command line, these features also apply to the heads-up Dynamic Input.
As you start typing, autocomplete fills in the rest of the name. It lists multiple choices sorted by the best match. It is also a way to view the list of related commands. For example, typing LA shows all commands for working with layers. Why? Most layer-related commands begin with LA.

Sloppy speller? AutoCAD has your back
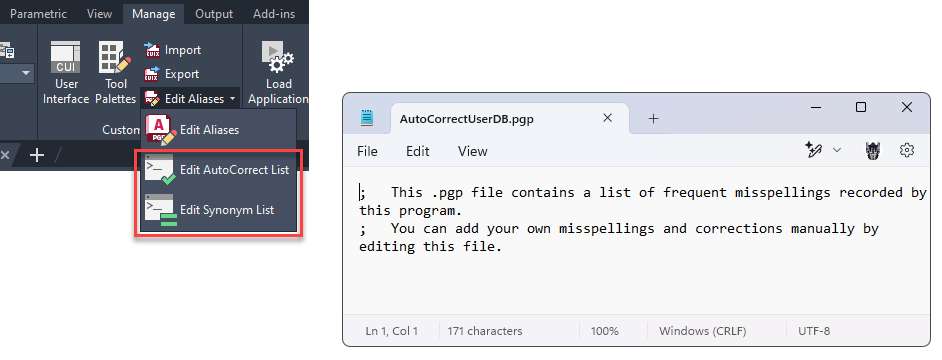
Even when misspelling a command name, you still might find it in the list. In the example below, typing LNE still reveals line in the list. AutoCAD also remembers misspellings and starts to include the words you repeatedly misspell as options for starting commands. You can edit the autocorrect and synonym lists from the Manage tab.
OOPS! And more keyboard commands
AutoCAD indicates command option shortcuts by capitalizing the letter. Here you can see with Fillet that U is the shortcut for undo, P for polyline, and R for radius.

If there is a default operation, pressing the spacebar (or enter) invokes the default.
There is also a set of commands only available from the command line. Like OOPS, a forgotten feature! This command restores the last deleted object, regardless of any other operations you may have performed in between.
Create your own shortcuts in AutoCAD
You can create your own shortcuts and edit existing ones. Use Edit Aliases (in the Manage tab) to launch the acad.pgp text file. To add a new shortcut, add the desired character combination and the command name prefixed with an asterisk (*).
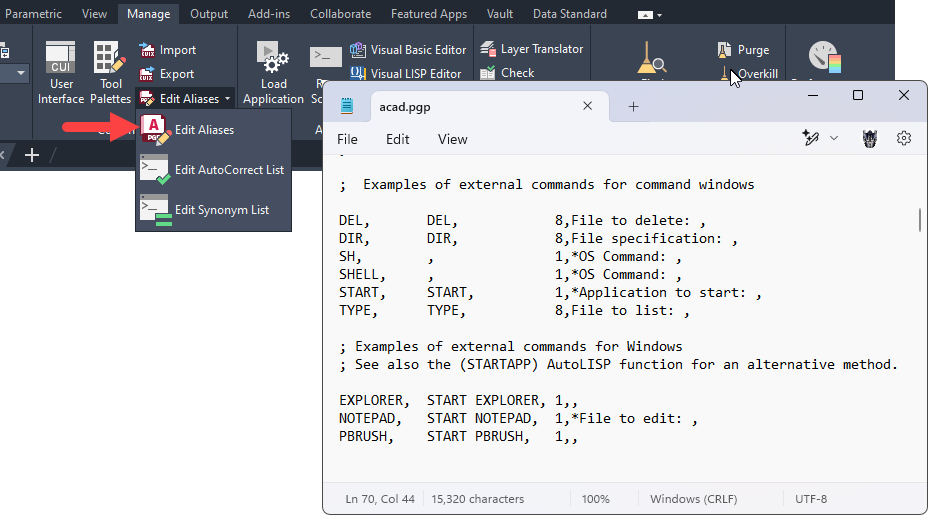
To load the changes, either restart AutoCAD or use REINIT.
Object snaps keep you on track
If there was a top “thou shall” list for using AutoCAD, leveraging object snaps would be number one. Object snaps let you precisely select points on objects, ensuring accuracy.
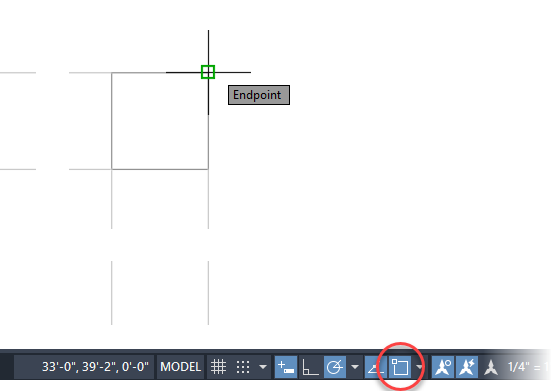
Enable object snaps from the status bar. These running object snaps become available whenever AutoCAD wants you to select a point.
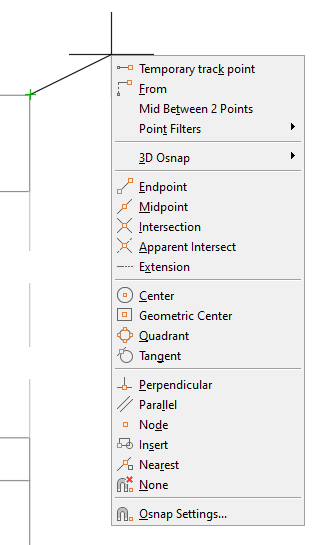
While holding Shift, right-click to access object snap overrides. When picking an override, that object snap becomes available for one selection, overriding the active running object snaps. Once you make the selection, AutoCAD returns to using the running snaps.
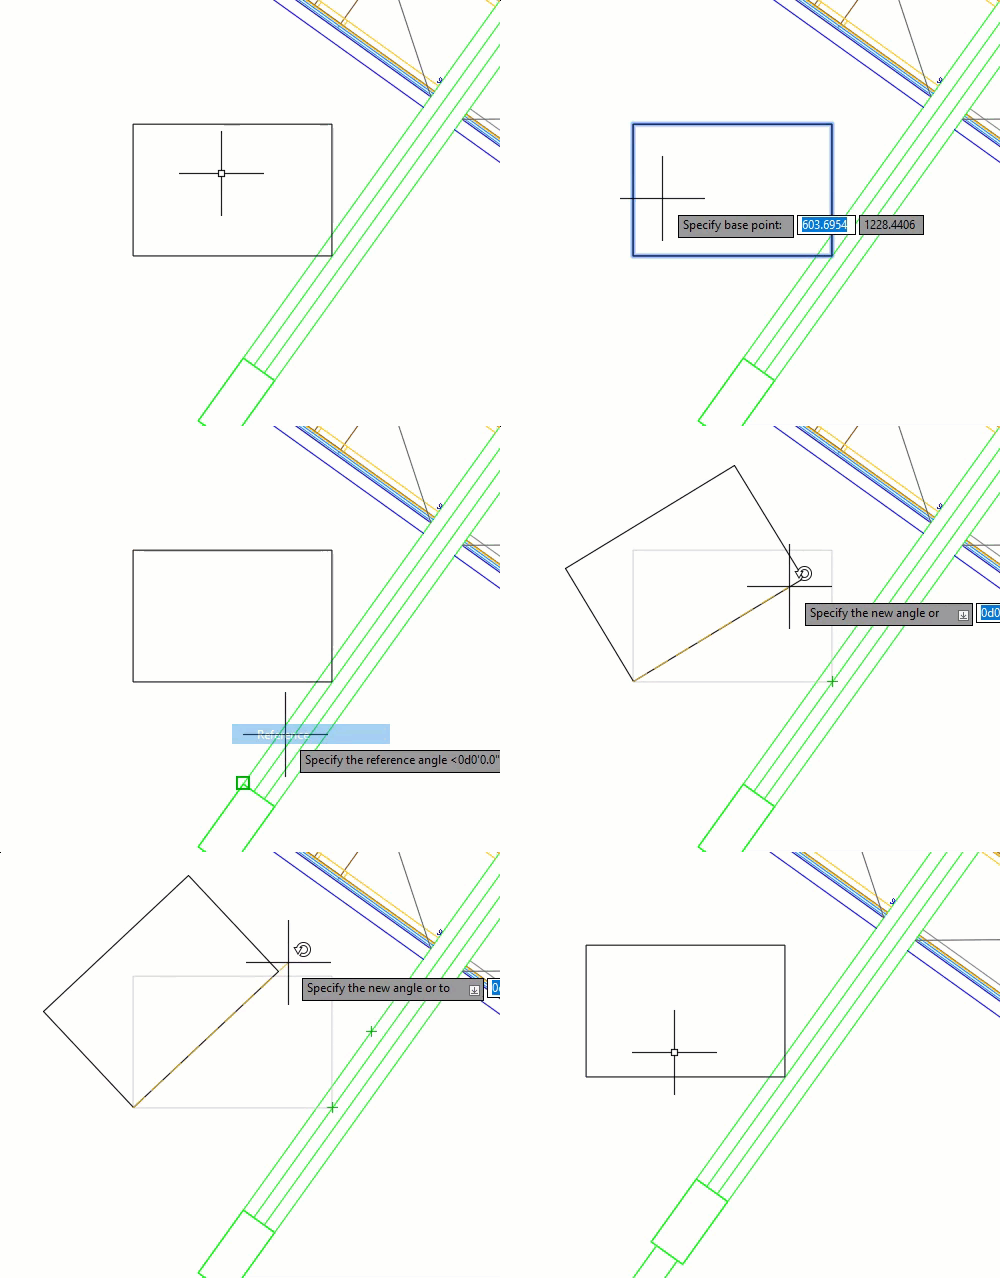
Rotating by a reference
ROTATE spins objects around a selected point. The default behaviour is selecting the base point, then specifying the rotation angle.
There are times when you need to align odd-angled objects. Or maybe you don’t know an object’s angle but can identify it by a line or edge. Instead of calculating the rotation angle, use Reference. This feature rotates objects from a specified angle to a new absolute angle. You rotate the object based on its current angle or a specific reference angle.
After selecting the base point, invoke Reference. Then specify the reference angle either by picking two points to set the angle or by pressing Enter to use the object’s current angle. Then enter the desired angle.
Undo just want you want
Clicking Undo while in a command undoes the entire command sequence. So if you had already created multiple line segments, Undo would remove all the segments. However, if you use the command’s undo (U or Ctrl+Z) it only undoes the previous segment.

When trim is extend and extend is trim
When using Trim and Extend, holding Shift performs the opposite function. For example, while trimming, hold the Shift key to extend instead.
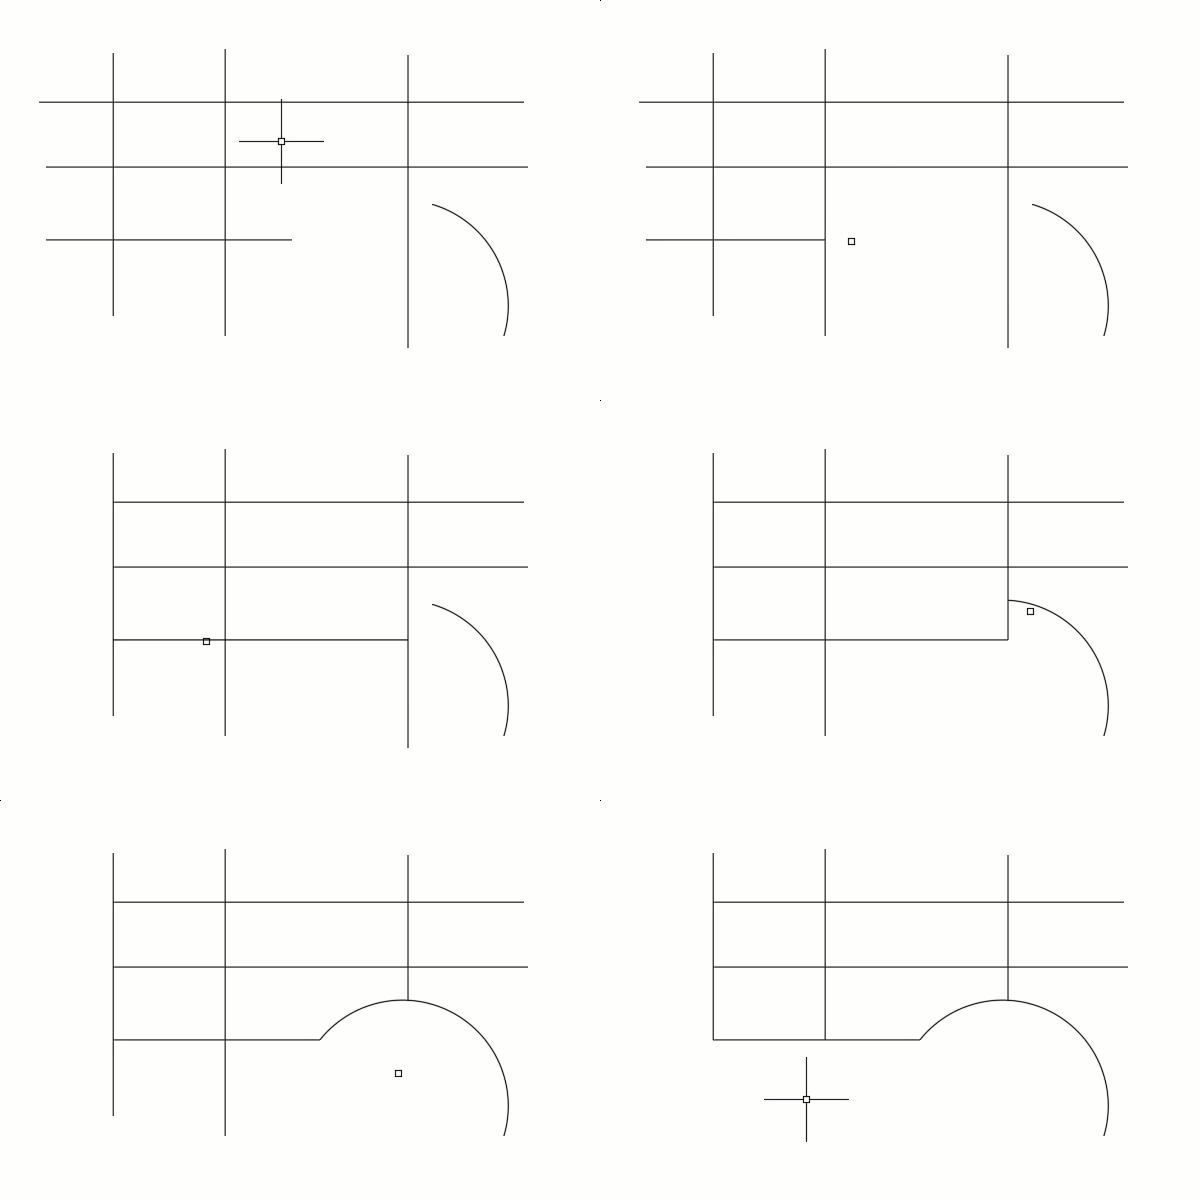
Faster trims and extends
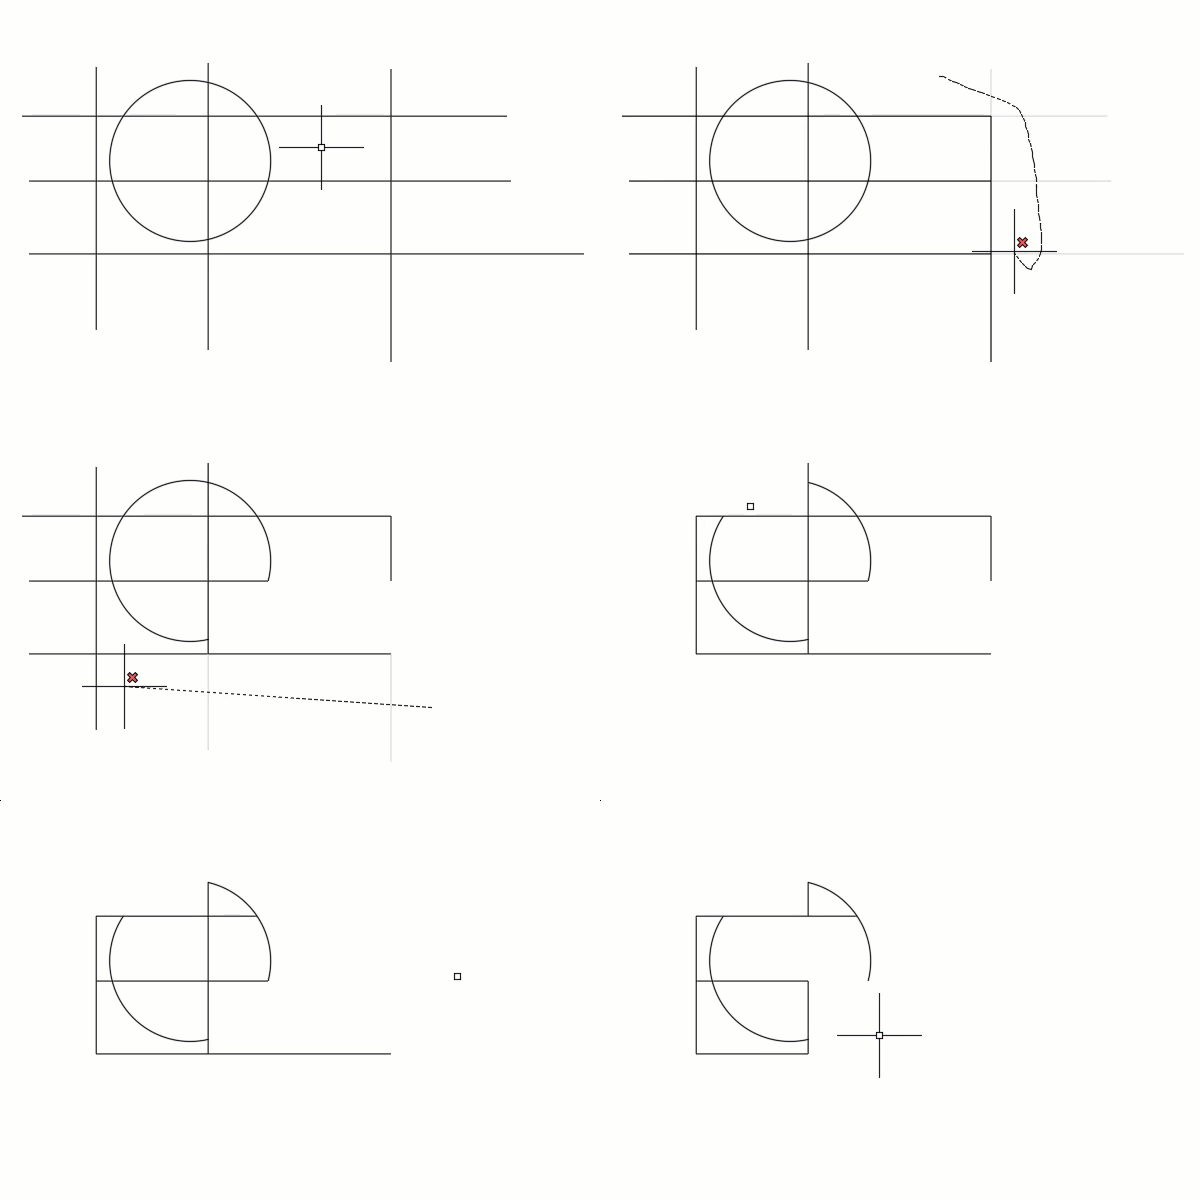
Immediately after starting Trim, click and drag to lasso-freehand select objects to trim. Or pick two points to trim a section by a crossing fence. AutoCAD uses all objects as cutting edges. AutoCAD deletes the selected object if trimming is not possible.
Extend offers the same quick-mode methods for selecting objects. Rather than trimming, it extends the objects to suitable boundary edges.
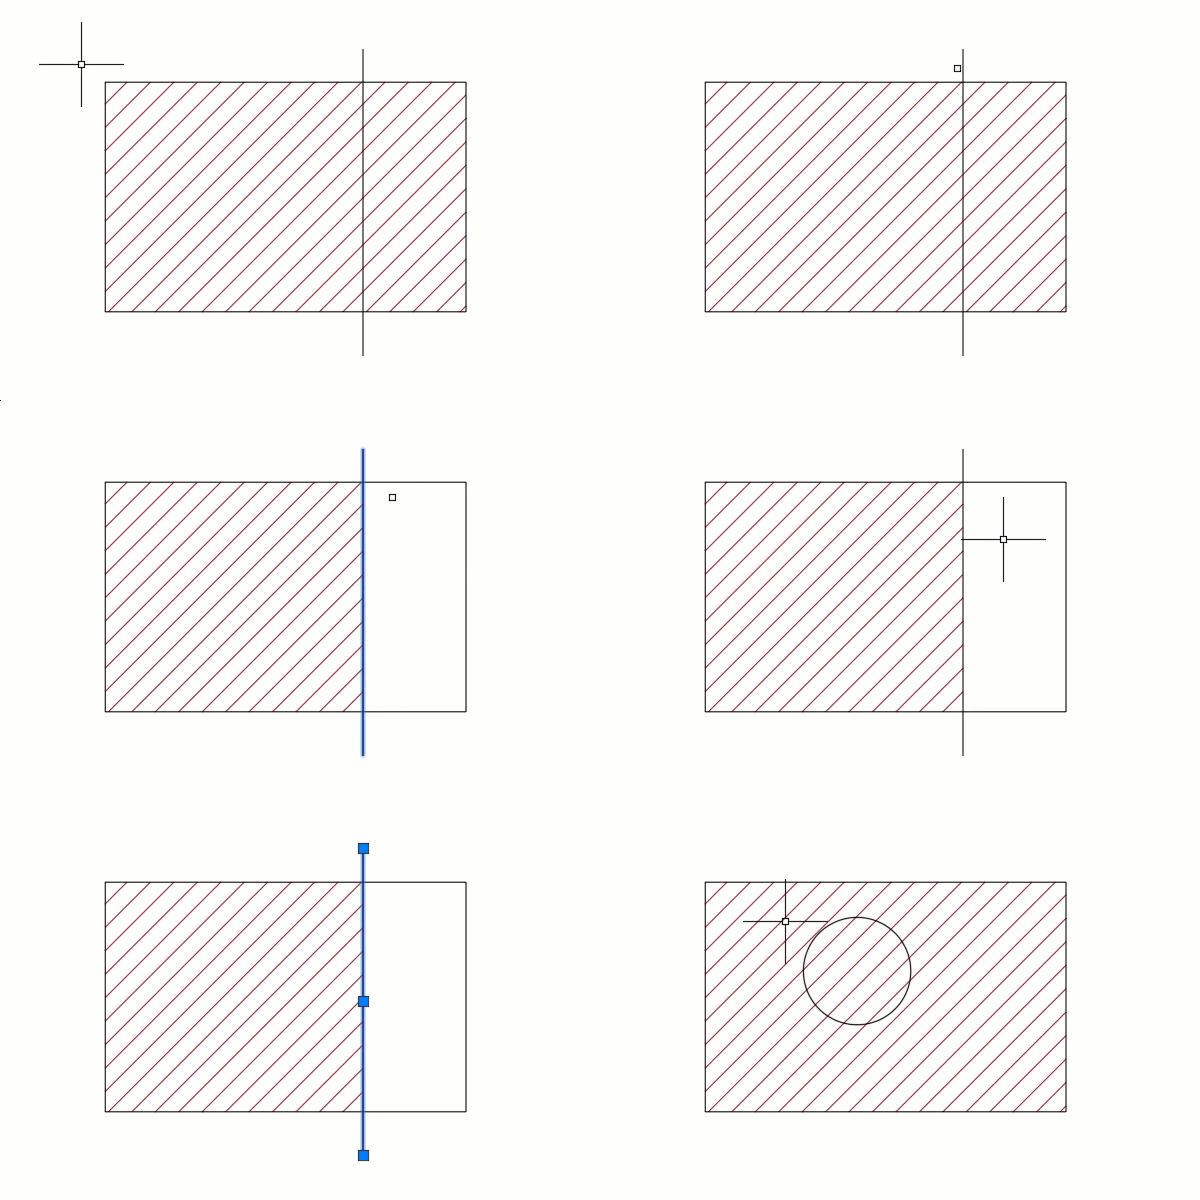
Bonus tip: You can trim hatch!
Offset with options
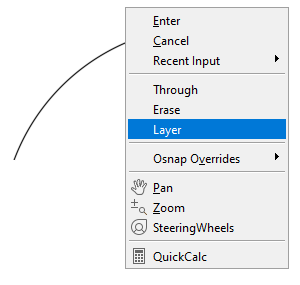
OFFSET creates parallel lines, curves or polylines at a specified distance from the original. You can use its options to erase the source object and decide whether to create the new objects on the current layer or the source object’s layer.
Evenly distributing objects in AutoCAD
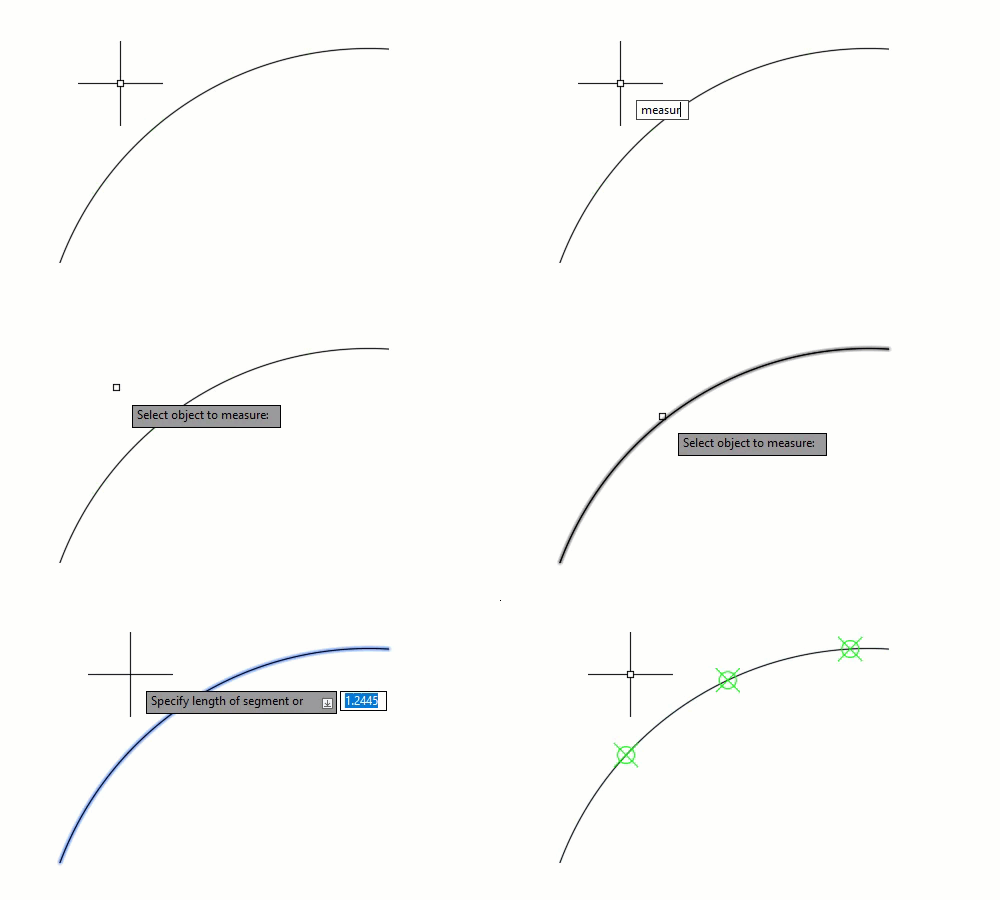
Divide and Measure help you evenly distribute across objects. Divide splits an object into the specified number of equal segments. With Measure, it places objects along the object at measured distances.
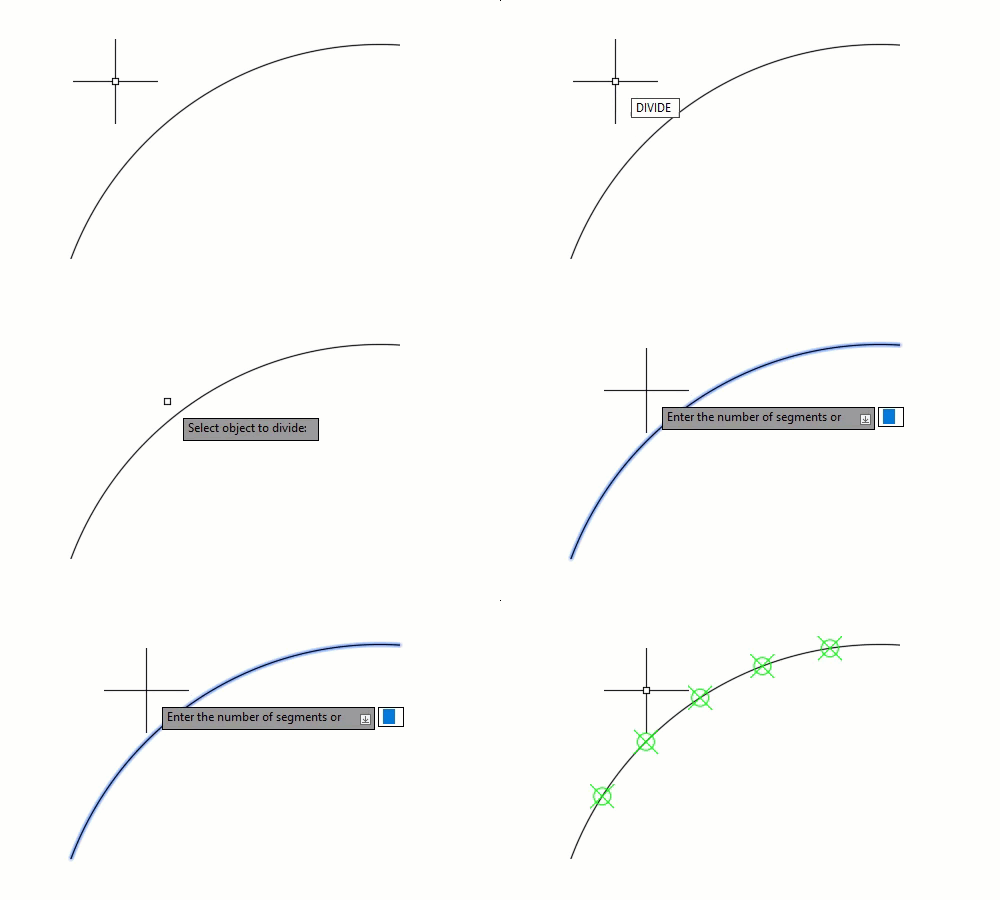
You can use these commands on lines, arcs, polylines and splines. By default it places points, but you can optionally place blocks instead. Points are useful for snapping to precise locations.
Clean up with fillets
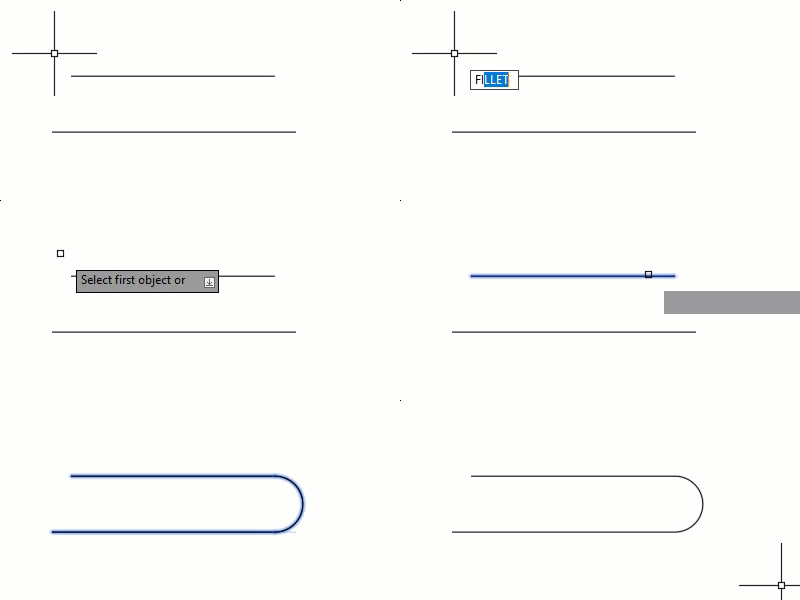
Use FILLET to create rounded corners and CHAMFER for angled corners. After selecting the first object, hold Shift to create a sharp corner. This overrides the current radius or bevel dimensions. As AutoCAD trims or extends the selected objects to form the corner, this is a convenient clean-up tool, especially when drawing walls.
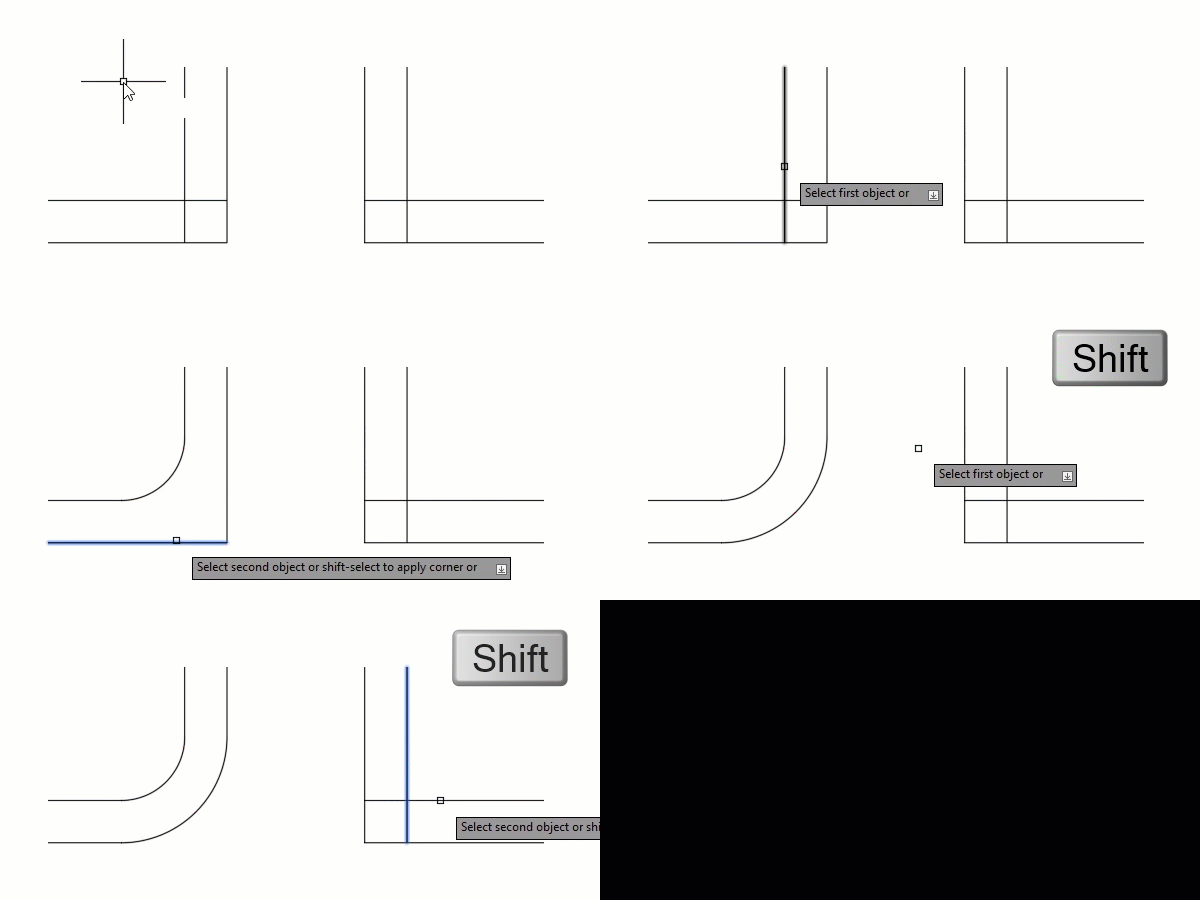
With both Fillet and Chamfer, invoke the Multiple option to continuously apply arcs/bevels until pressing Escape.
Filleting quicker
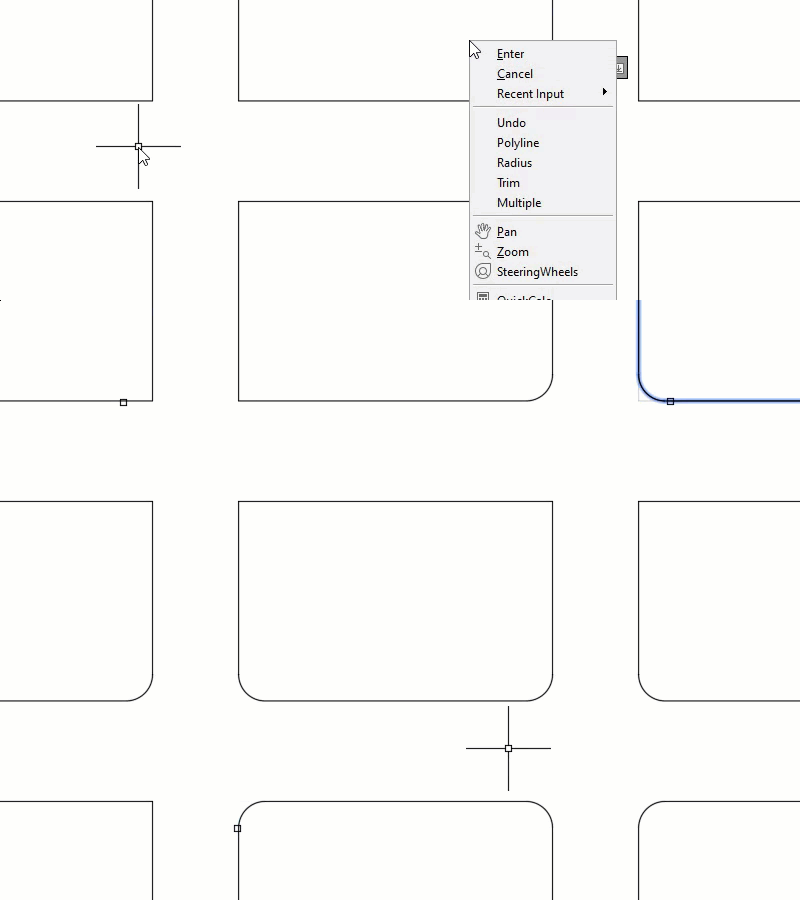
When filleting a circle, AutoCAD does not trim the circle but creates the fillet arc tangentially to the circle. When filleting two parallel lines, AutoCAD creates an arc tangent to both lines, overriding the current radius and using the distance between lines as the diameter.
One step move, rotate and scale
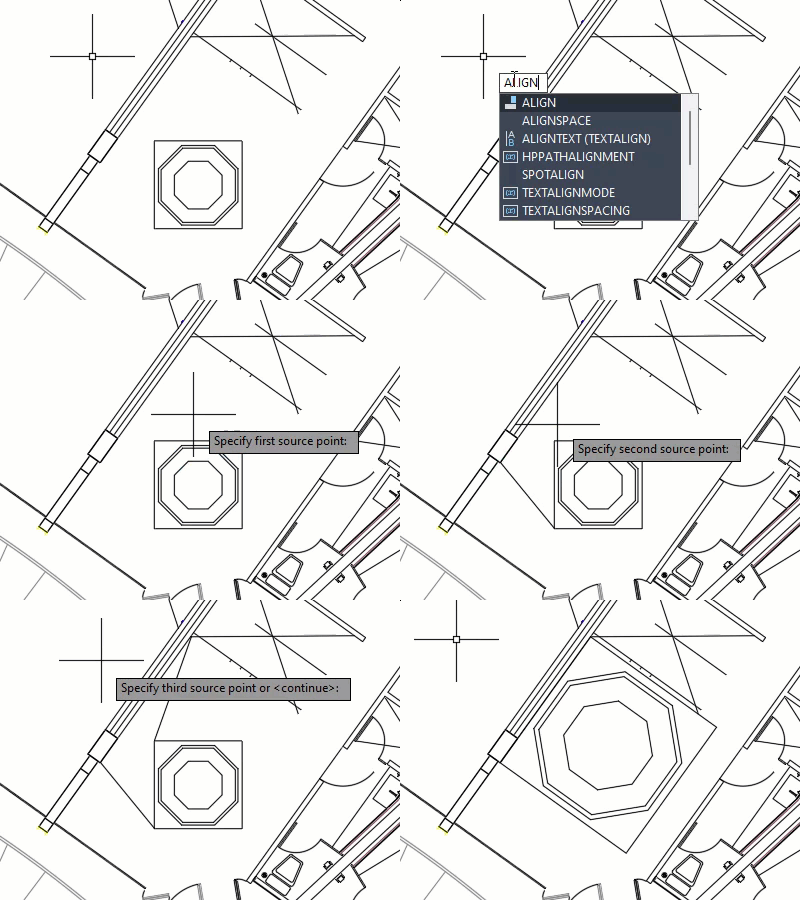
Are you looking for a method to move, rotate and scale objects while also aligning them with other objects in the drawing? Look no further than Align. It works not only on 3D objects but 2D as well. Its advantage is efficiency, aligning objects in one step instead of using multiple commands.
After starting the command, select the objects you want to align. Next, specify the source points. You need at least one but can pick up to three. Next, choose the destination points, the locations where you want the objects to go. The number of destinations always matches the number of sources selected. The order of selection determines the pairing of points.
If you only select one source/destination pair, AutoCAD moves the objects. With two pairs, AutoCAD moves and rotates the objects. The first pair sets the movement, and the second pair manages the rotation. Typically, only 3D objects use three-point pairs.
AutoCAD prompts if you want to scale the objects.
BOUNDARY uses similar workflows to hatch but creates regions or polylines from enclosed areas. You can also extract the boundary from a hatch, which is useful when you need an object for the perimeter of an area. Just right-click the hatch pattern and select Generate Boundary.
Get a grip on AutoCAD grips
AutoCAD’s grips, like a good friend, are always there when you need them. Grips are the small squares appearing on objects when you select them. Not only do they provide details, they let you manipulate objects quickly and easily. How much you can do with grips might surprise you.
The default grip mode is Stretch. You can grab the end of a line and adjust its position.

As you hover over a grip, AutoCAD supplies options for manipulating the point (and object). This menu is specific to the object and only appears on grips with multiple options. For example, hovering over the endpoint of a line supplies Stretch and Lengthen, whereas for a polyline, it supplies features for working with the vertex.
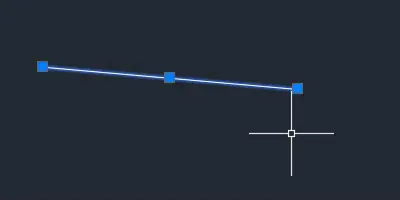
Dynamic Input gives users real-time feedback and input alternatives while they are sketching and editing. It complements grips by displaying relevant information and prompts.
While hovering over a grip, Dynamic Input displays dimensions about the size of the object. After making the grip hot, use the prompts to adjust the size of the object. Pressing Tab while using Dynamic Input toggles between the prompts. Press Enter when you want to accept your change.
One of the best uses of grips is with dimensions. You can easily adjust the position of the dimension and dimension text all without starting a command. You can also change what the dimension is dimensioning. Just do not forget to reassociate it after.
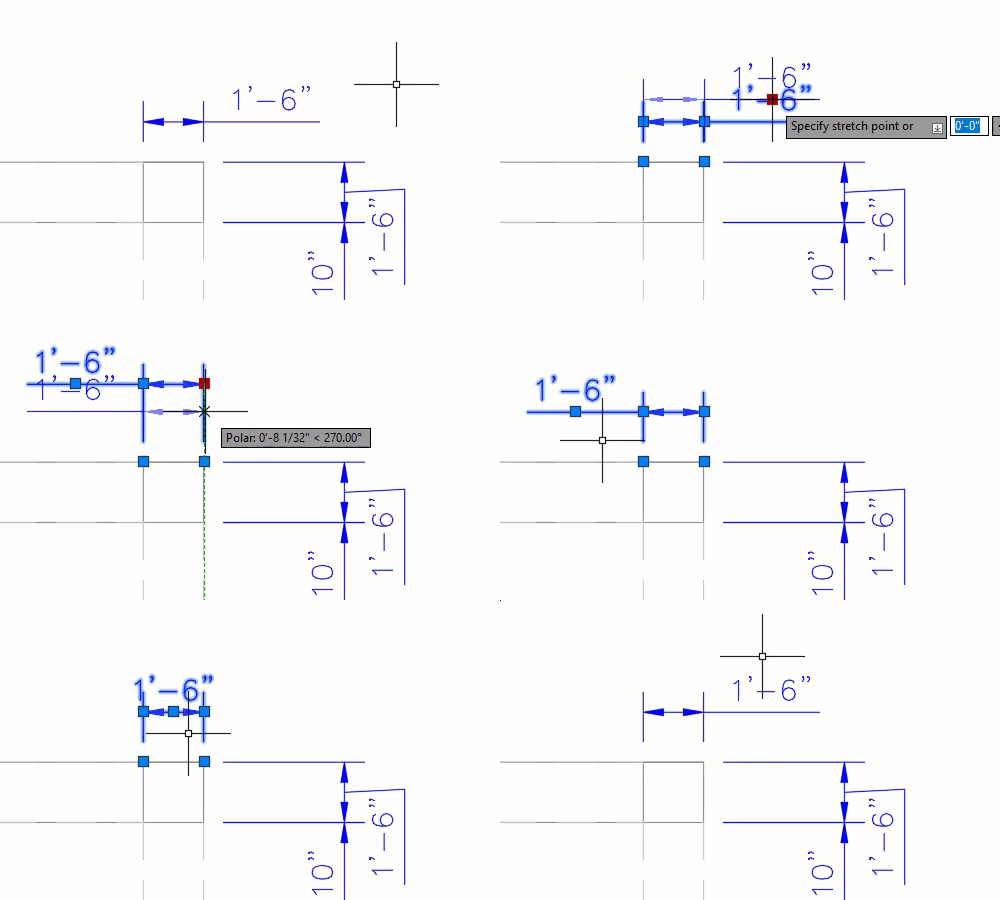
Want to learn more about grips? Check out Grips Can Be the AutoCAD User’s Best Friend.
Making it quicker with AutoCAD’s quick tools
AutoCAD features a series of “quick” tools, named so because they are faster than their predecessors.
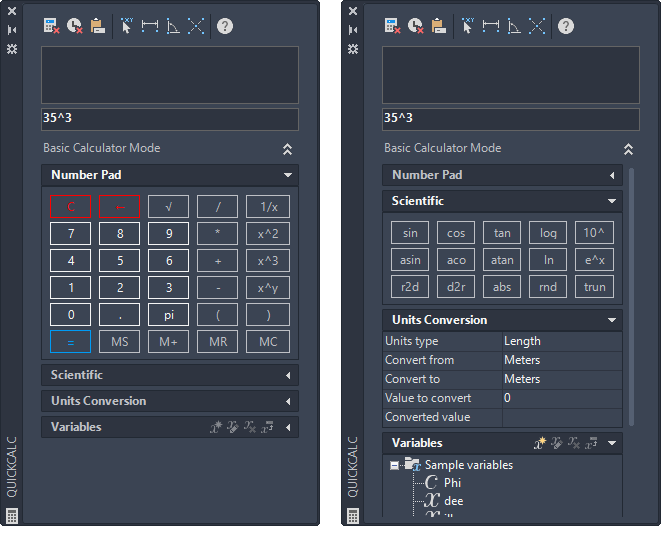
QuickCalc is a built-in calculator allowing you to perform calculations transparently and push the results into active commands. You can find it on the right-click menu.
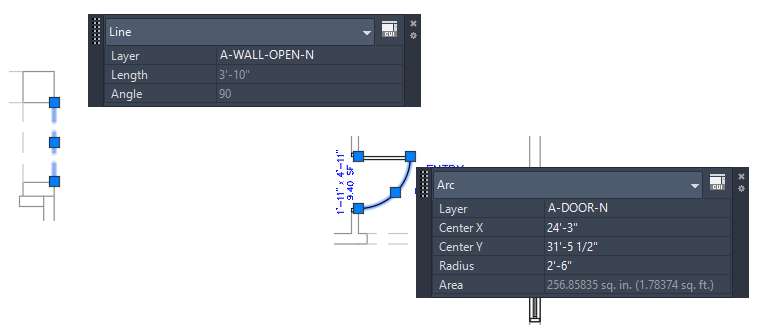
Double-clicking an option opens the Quick Properties palette. This palette is context-sensitive and displays properties relevant to the selected objects.
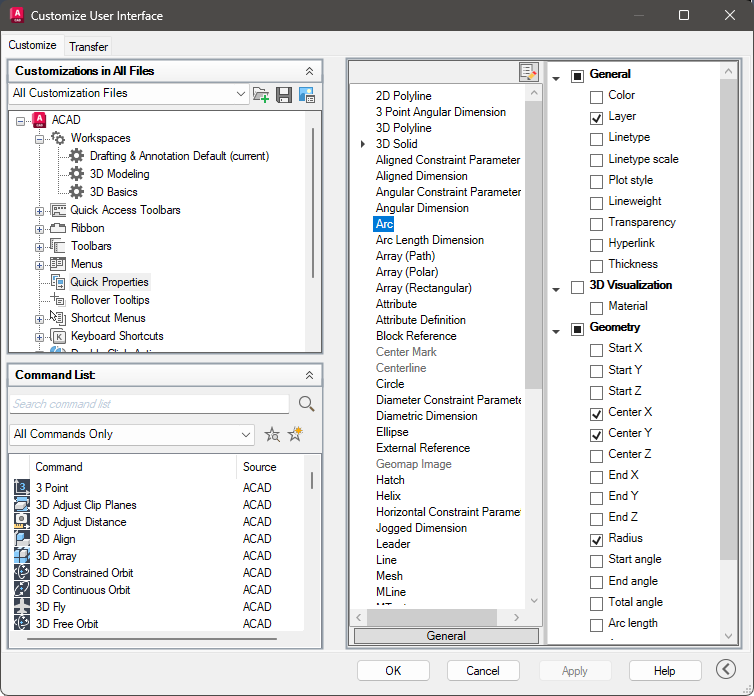
You set which properties display in the Customize User Interface dialog. This means quick access to the properties you use most frequently.
Quickly selecting objects
Use Quick Select to quickly create selection sets on the fly based on object properties. For example, selecting all circles in the drawing with a radius less than two feet that are on the holes layer.
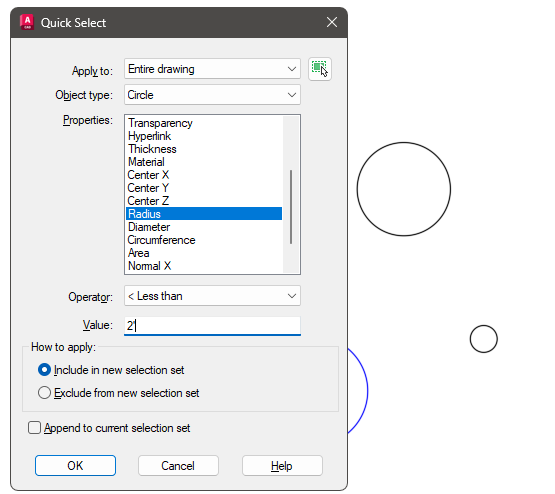
Matching object properties
While it may not be a quick tool by name, it serves a quick purpose. MATCHPROP, which is like the Format Painter in Microsoft Office, copies properties from the selected object and applies them to other objects you select. Even with different object types, it still copies common properties, like the layer and color.
Sharing between drawings
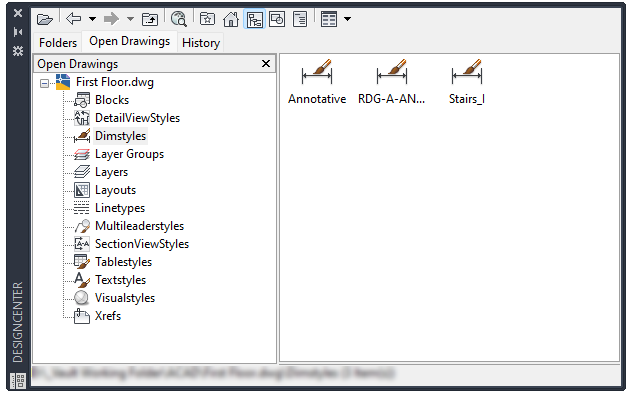
Use the Design Center to reuse content from other drawings, such as blocks. This also works to copy layers and styles from one drawing into another. This is an excellent shortcut for using styles from other drawings.
Purging the drawing bloat
Over time your drawings start to bloat. You should regularly perform housecleaning to keep your drawings performing at tip-top shape.
Use PURGE frequently to remove unused objects like blocks, layers and styles.
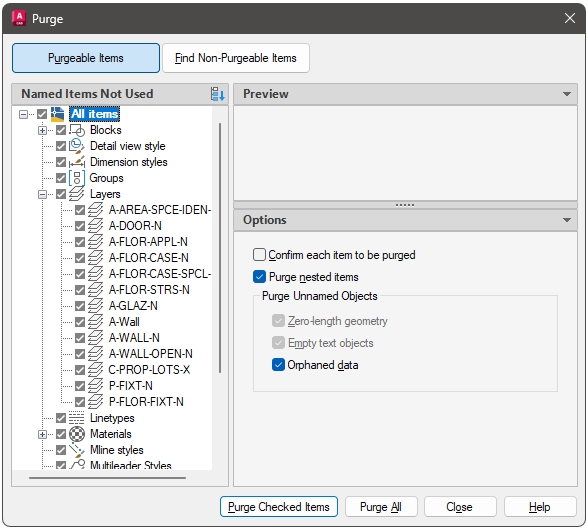
The command line version (-purge) additionally removes Regapps. These tags come from other add-ons and store extra data relevant to these registered applications. Purging these tags reduces file size but might also deal with conflicts or unexpected behavior.

Use OVERKILL to remove duplicate or overlapping lines, arcs and polylines. Not only does this clean up your drawings, it makes them easier to work with.
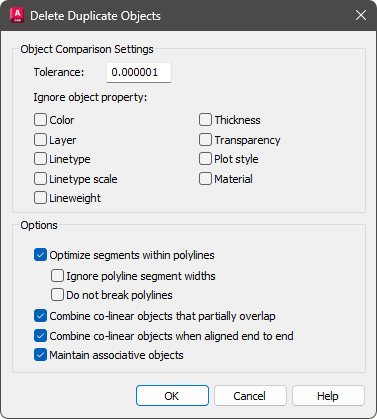
Check the health of your drawings
Take advantage of AUDIT to check your drawing for errors and inconsistencies. Consider running this whenever importing data from a program that’s not AutoCAD.


